Manual Change Reconciliation
A new optional feature, Manual Change Reconciliation, has been added to the Change Report tab (Reports > Change Report) to allow for manual approval of any changes that have occurred within your Cloudhouse Guardian (Guardian) instance, giving you greater control over configuration changes. With this enhancement, you can filter changes by type, approval status, or node group, then selectively approve or unapprove them, add comments, and associate them with external change request IDs. Approved changes are tagged and can be exported in a PDF and CSV report. This allows for more deliberate change management, especially in dynamic environments where frequent updates occur. For more information on the Change Report tab's functionality, see Change Report.
Note: This is an optional feature that was introduced in V3.59.2 of the Guardian web application and must be enabled. For more information on how to enable it, contact your Cloudhouse Representative.
Change Indicators
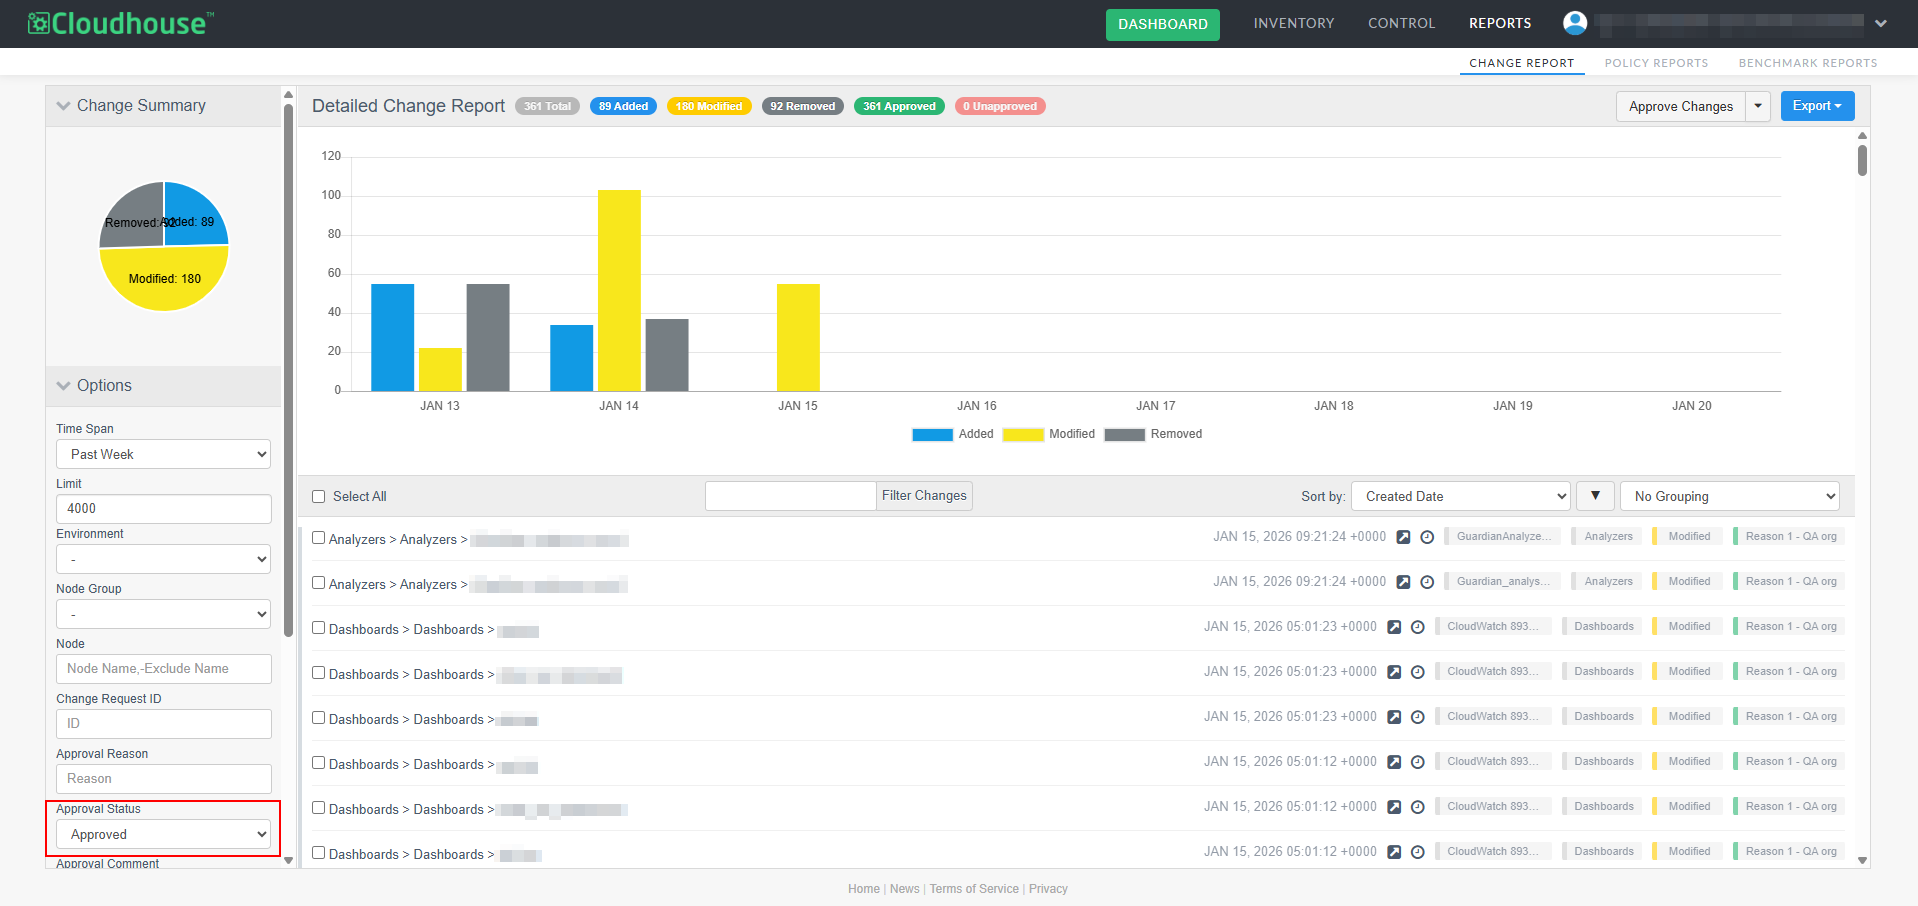
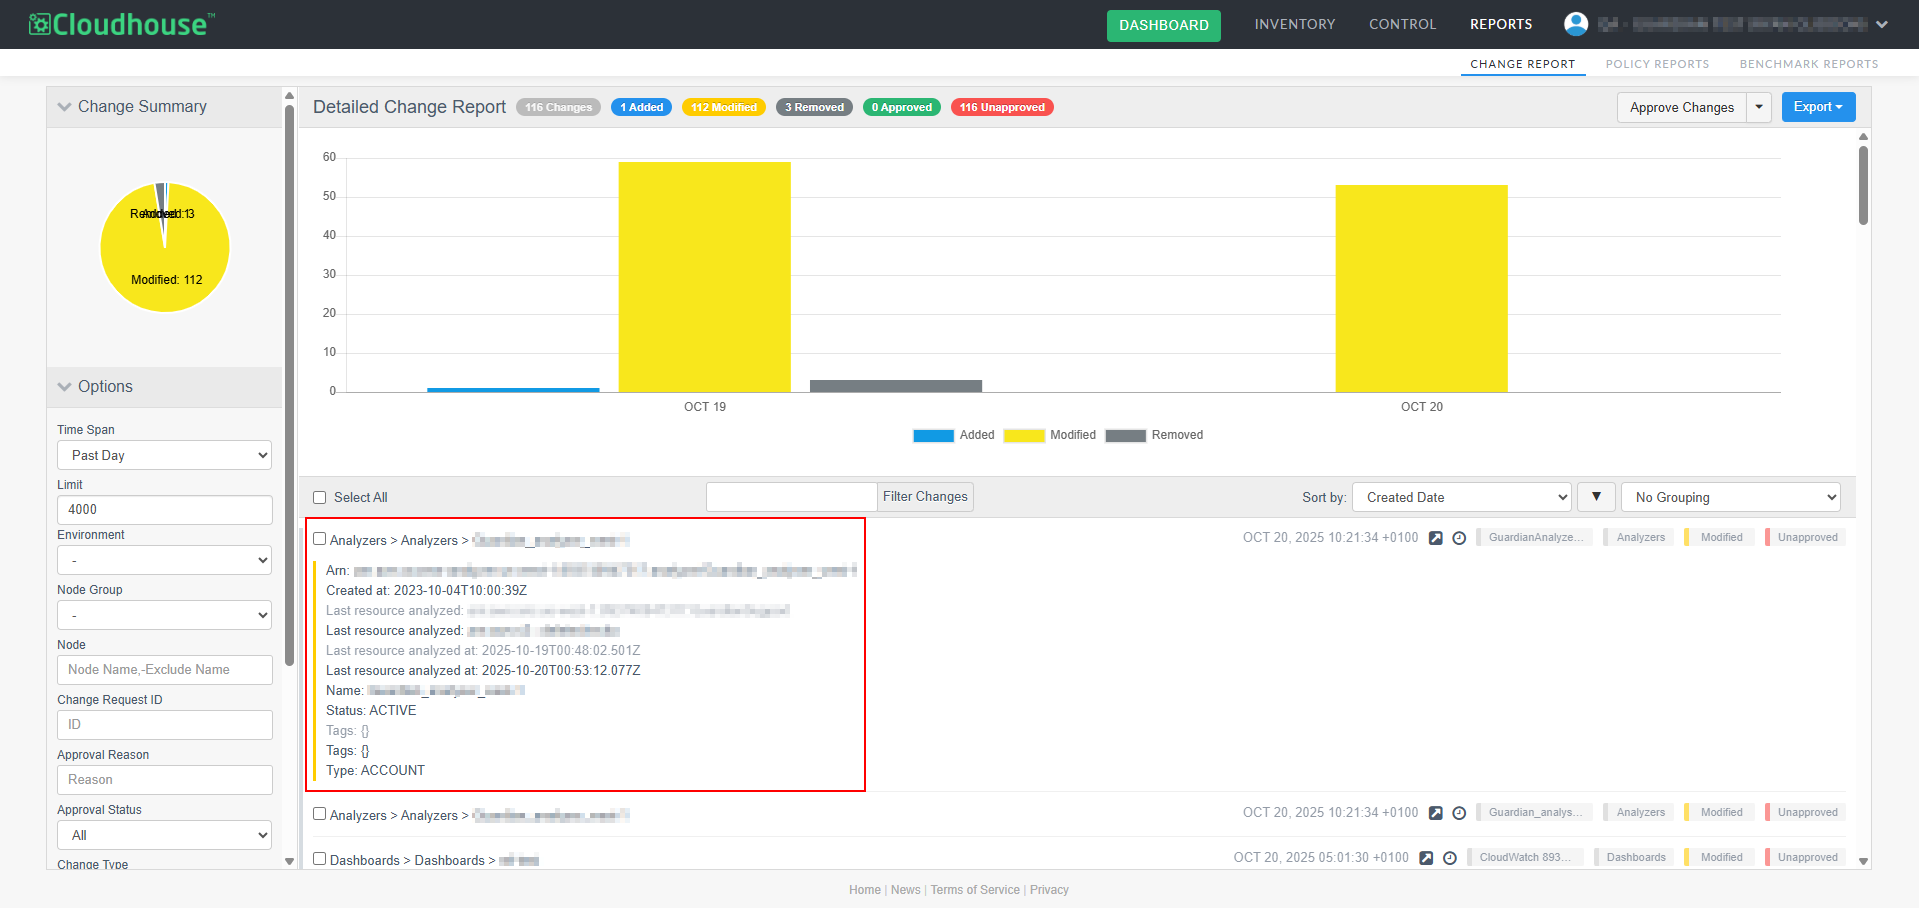
With the Manual Change Reconciliation feature enabled, the Change Report tab highlights the number of changed attributes, and the details of those changes within your Guardian instance, as demonstrated in the screenshot below.
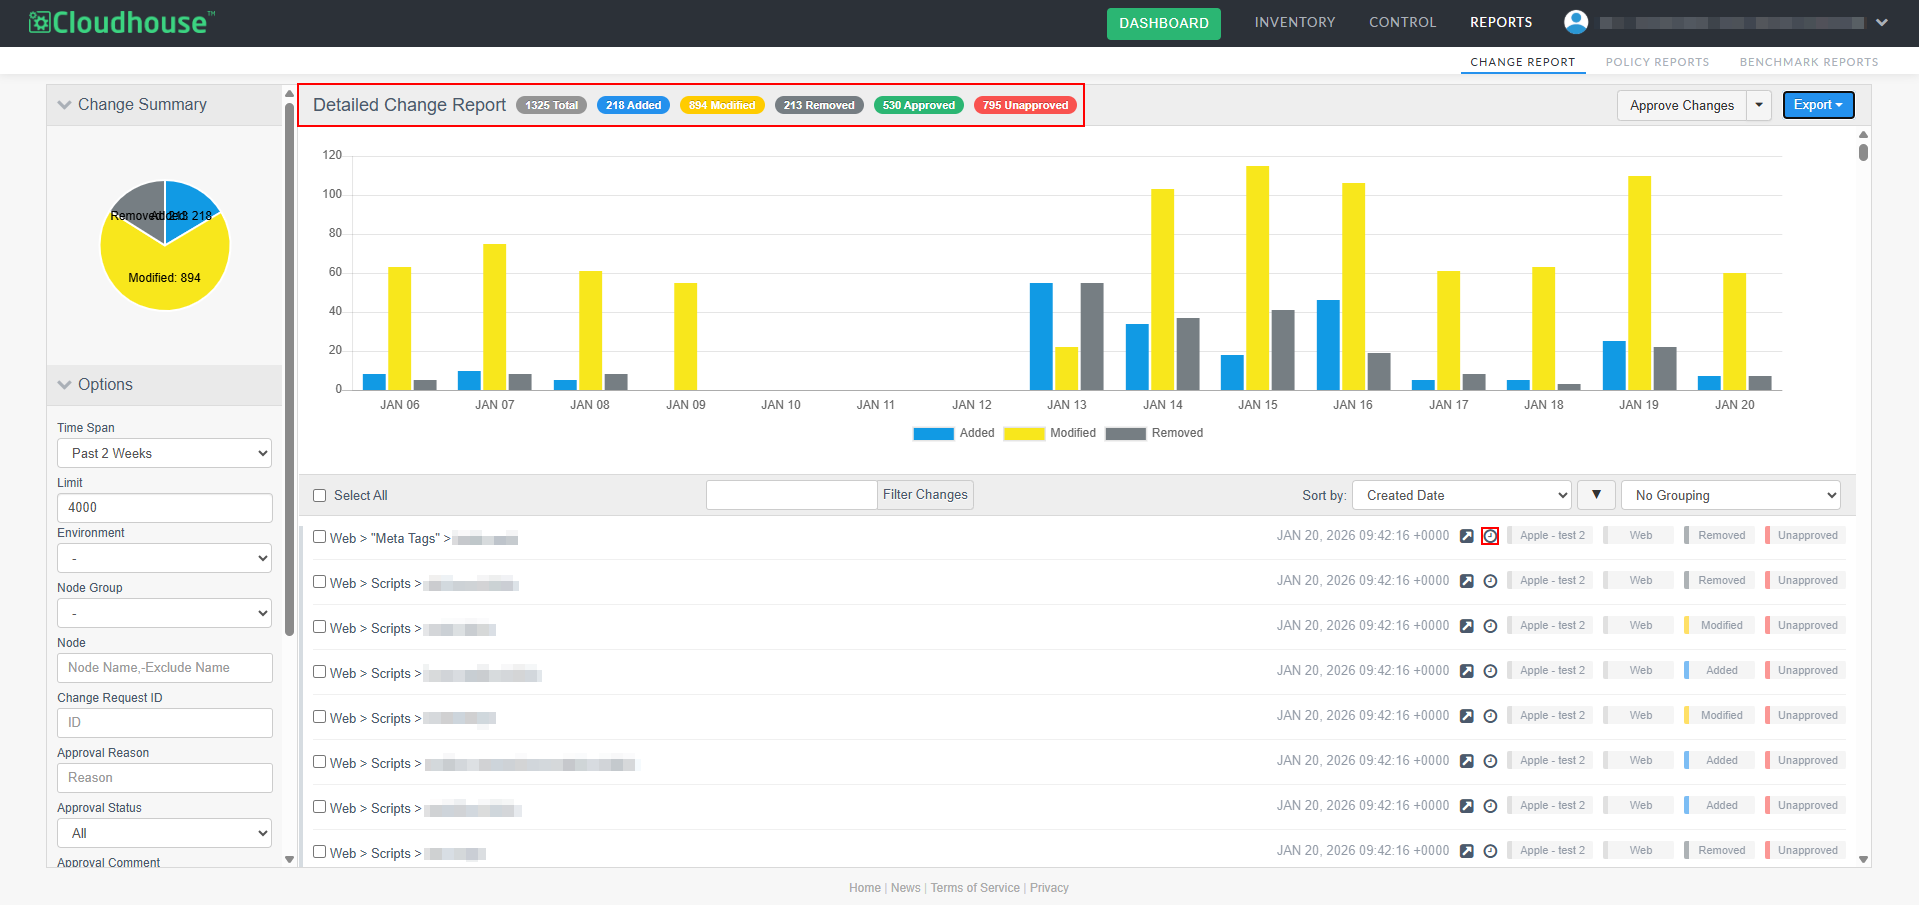
The following table describes each of the change indicators displayed:
| Change Indicator | Description |
|---|---|
| Changes | The total number of changes in the Guardian instance. |
| Added | The number of changes that have been added. |
| Modified | The number of changes that have been further modified. |
| Removed | The number of changes that have been removed. |
| Approved | The number of changes that have been approved. |
| Unapproved | The number of unapproved changes. |
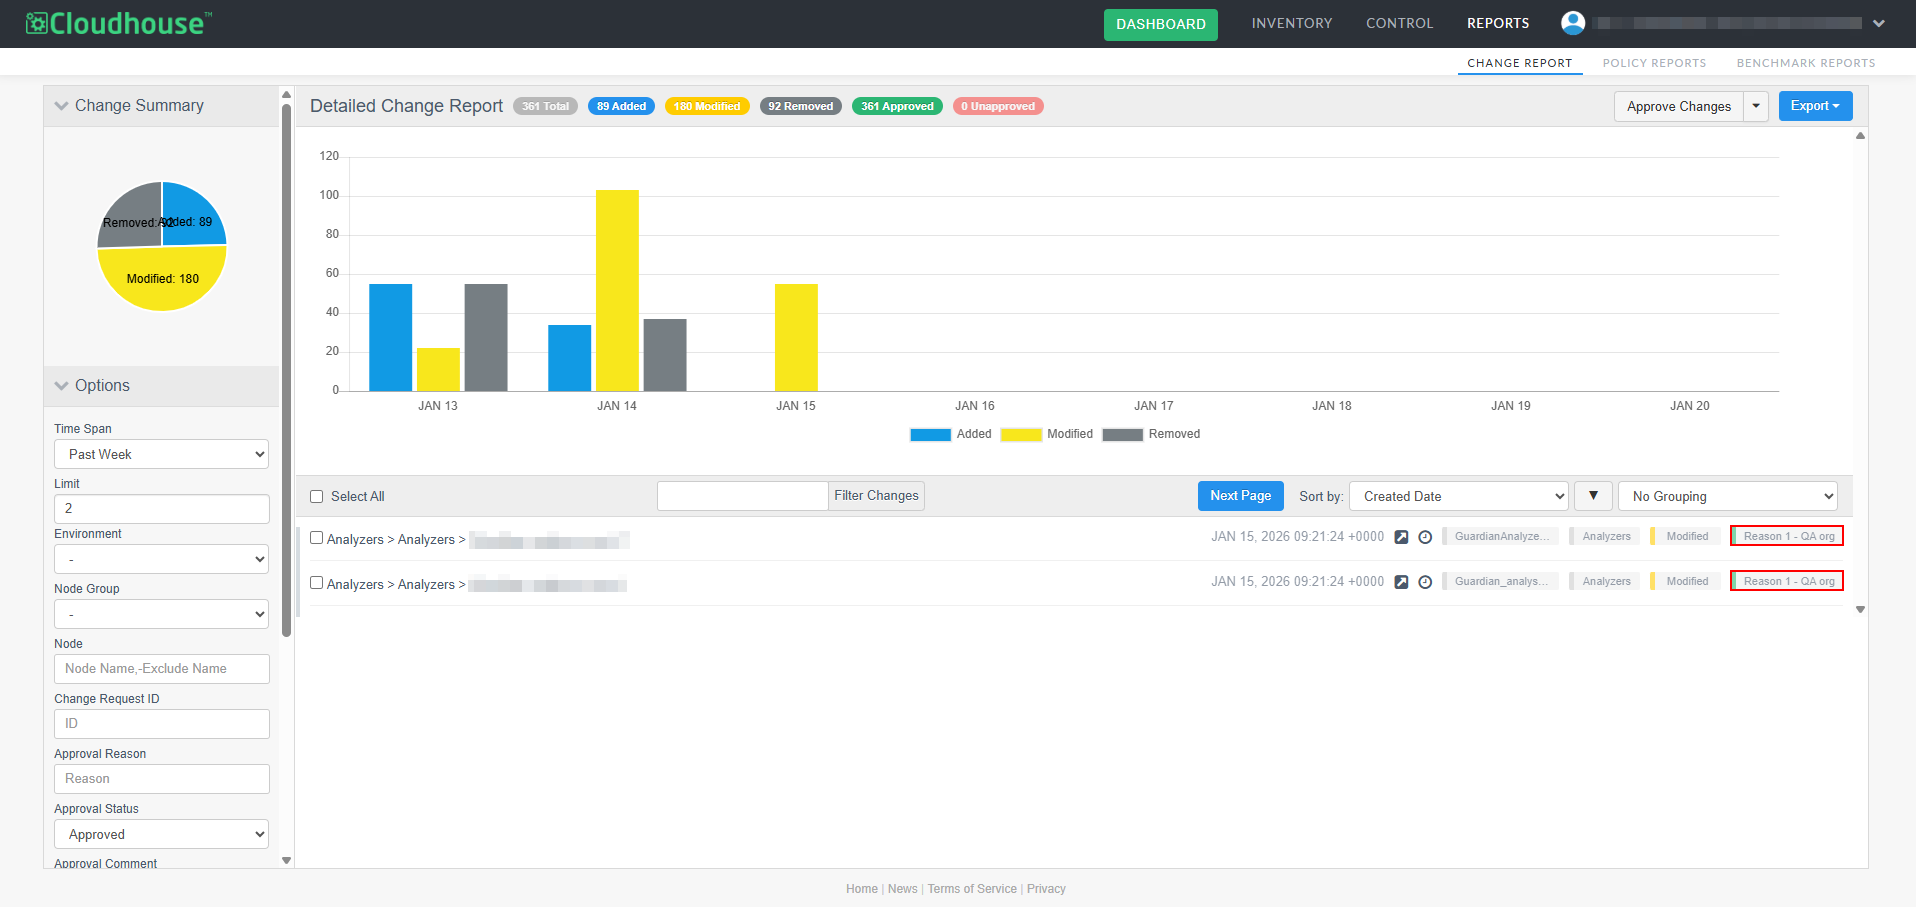
Change Reference Tags
Each change is displayed within the Detailed Change Report table, with each row representing a change record. For each recorded change, there is a set of reference tags, which represents different elements of the change. There are four change reference tags in total, each corresponding with different values in the Options drop-down menu. Click on a tag to filter the change report according to that value. The change reference tags are described as follows, with each being highlighted in the screenshot below:
Note: For more information on additional filtering, see Report Options.

-
Node – The node that the attribute is assigned to.
-
Node Section Scan – The section of the scan that the change appears in.
-
Change Type – The type of change that has occurred (Added, Modified, Removed).
Note: Refer to Change Indicators for more information.
-
Approval Status – The approval status of the change. The status is reflected by the following colors:
-
Green – Approved.
Note: If the change has been approved, the tag will be updated with the change reference ID or the approval reason. Hover over this tag to display any comments that have been added.
-
Red – Unapproved.
-
Once you've established how the change report displays your information, you can begin to filter your results or start immediately approving changes. For more information on filtering your results, see Group and Filter Changes.
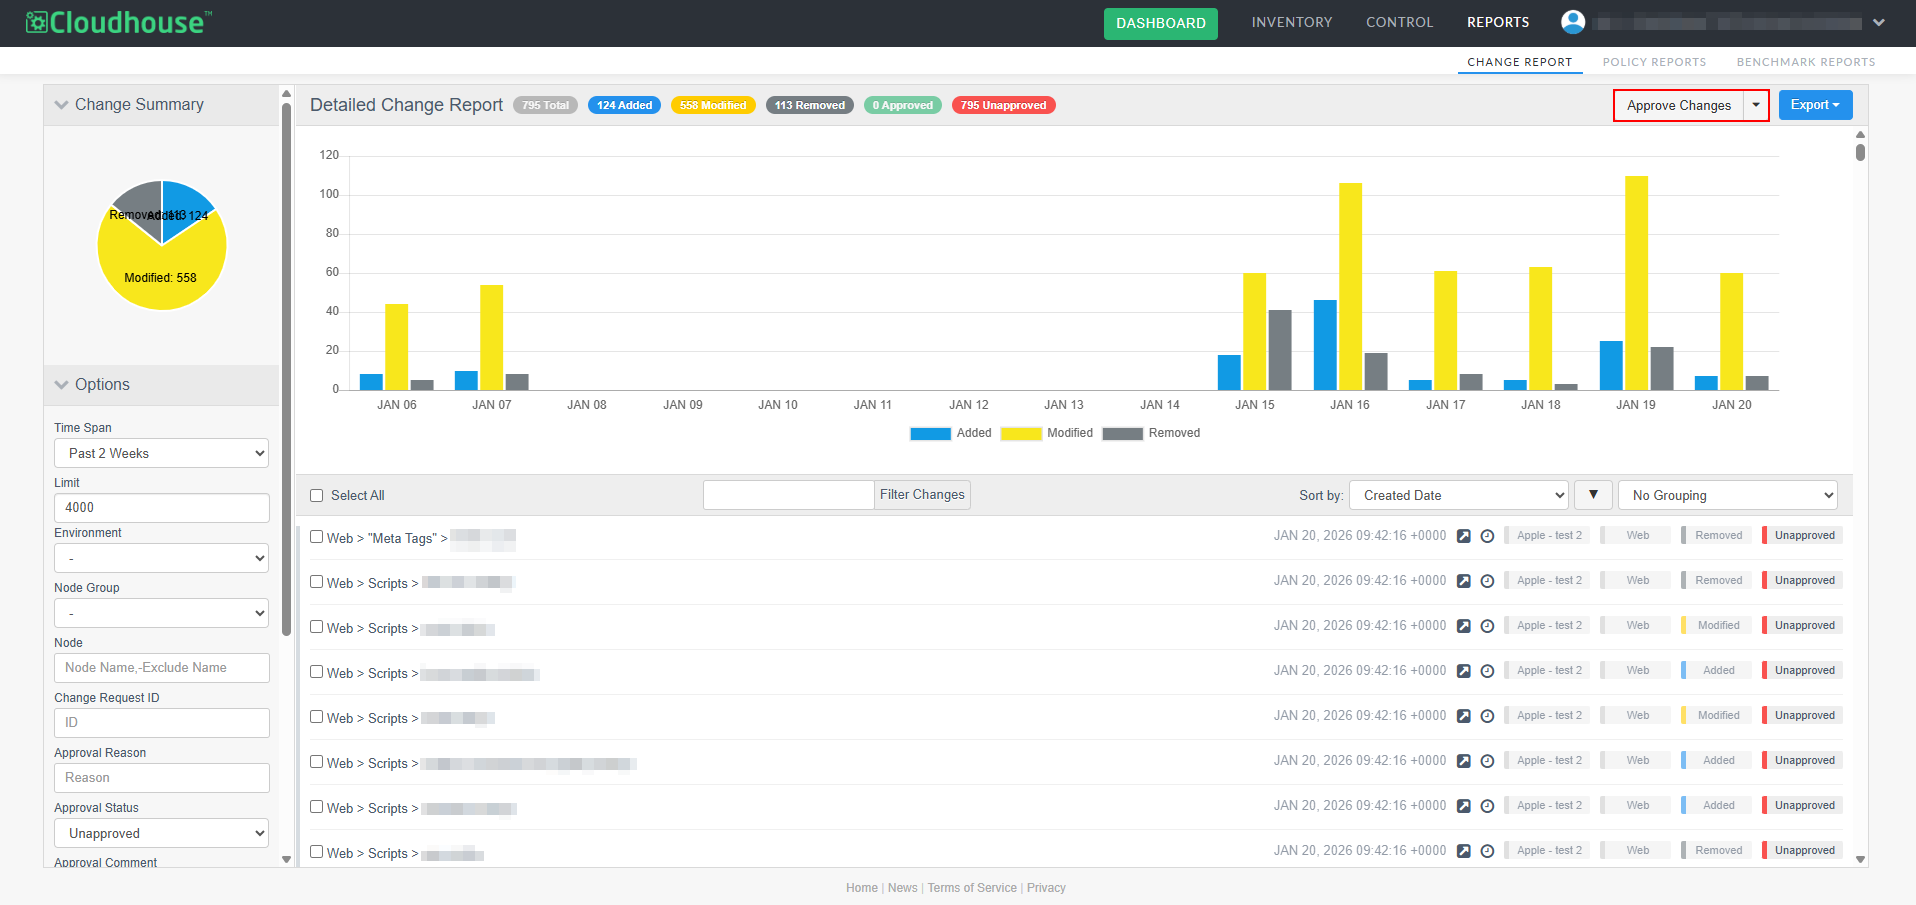
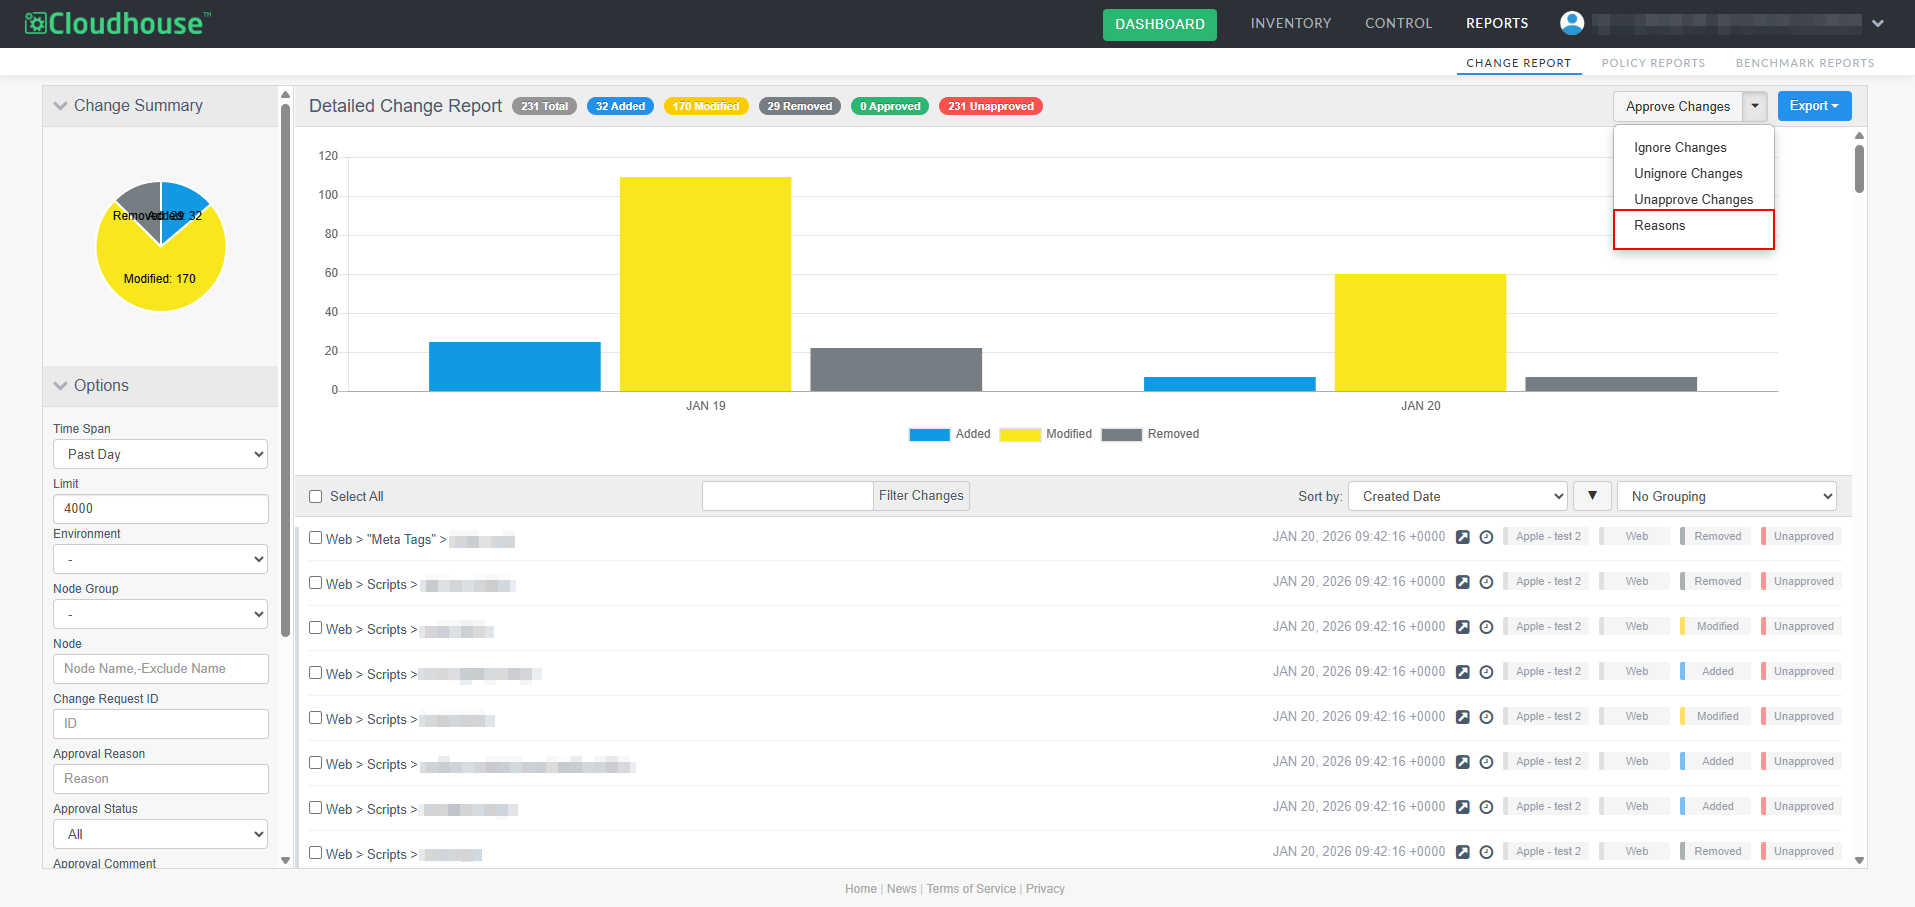
Approve Change
You can manually approve any changes that have occurred within your Guardian instance.
Tip: Only users with appropriate Administrative privileges can access sensitive approval actions within the Change Report tab. Analysts and Members can view the Change Report tab, but cannot perform reconciliation actions. For more information on the permissions attributed to each role type, see Users.
To approve a change, complete the following steps:
-
In the Options drop-down menu, click the Approval Status drop-down list and select Unapproved. The change report will refresh to only include unapproved changes.

-
Select the change that you want to approve by clicking on the relevant checkbox(es).
Tip: Alternatively, you can use the Options menu to filter the pending changes within your report and click to Select All that match the criteria you've set. As of V3.61.0 of the Guardian web application, you can now bulk approve up to 50,000 records at a time. For more information, see December 2025 Monthly Release.
-
Then, click Approve Changes. The Approve Changes dialog box is displayed.
-
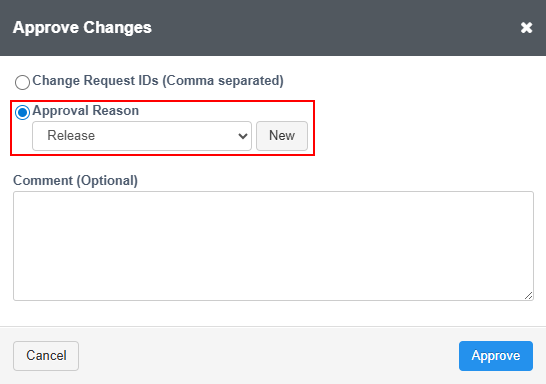
Select one of the following radio buttons, depending how you want to approve the change:
-
Change Request IDs – Enter the change request IDs for the selected change(s). You can enter multiple IDs, each separated by a comma.
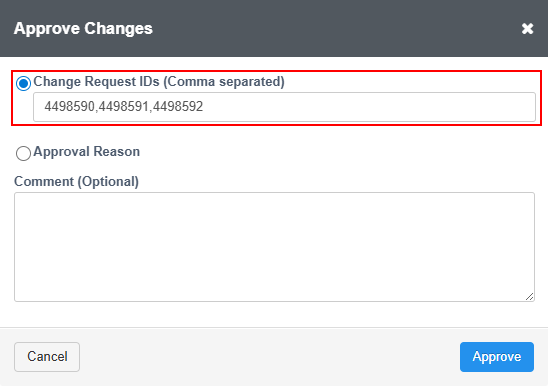
Note: Any change request IDs provided are only used for reference purposes and are not systemically linked to your external appliance.
-
Approval Reason – If a change you are approving is not tied to a ticket and does not have a corresponding change ID, you can provide a reason for the approval in lieu. To do this, select a reason from the drop-down menu, or create your own by clicking New.
Note: For more information on approval reasons, including how to view, modify, and add additional pre-set approval reasons to the drop-down list, see Approval Reasons.
-
-
Optionally, add a comment to clarify the reason for the approval.
-
Click Approve.
The changes will be reflected with the change request ID or the approval reason tag, as seen below.
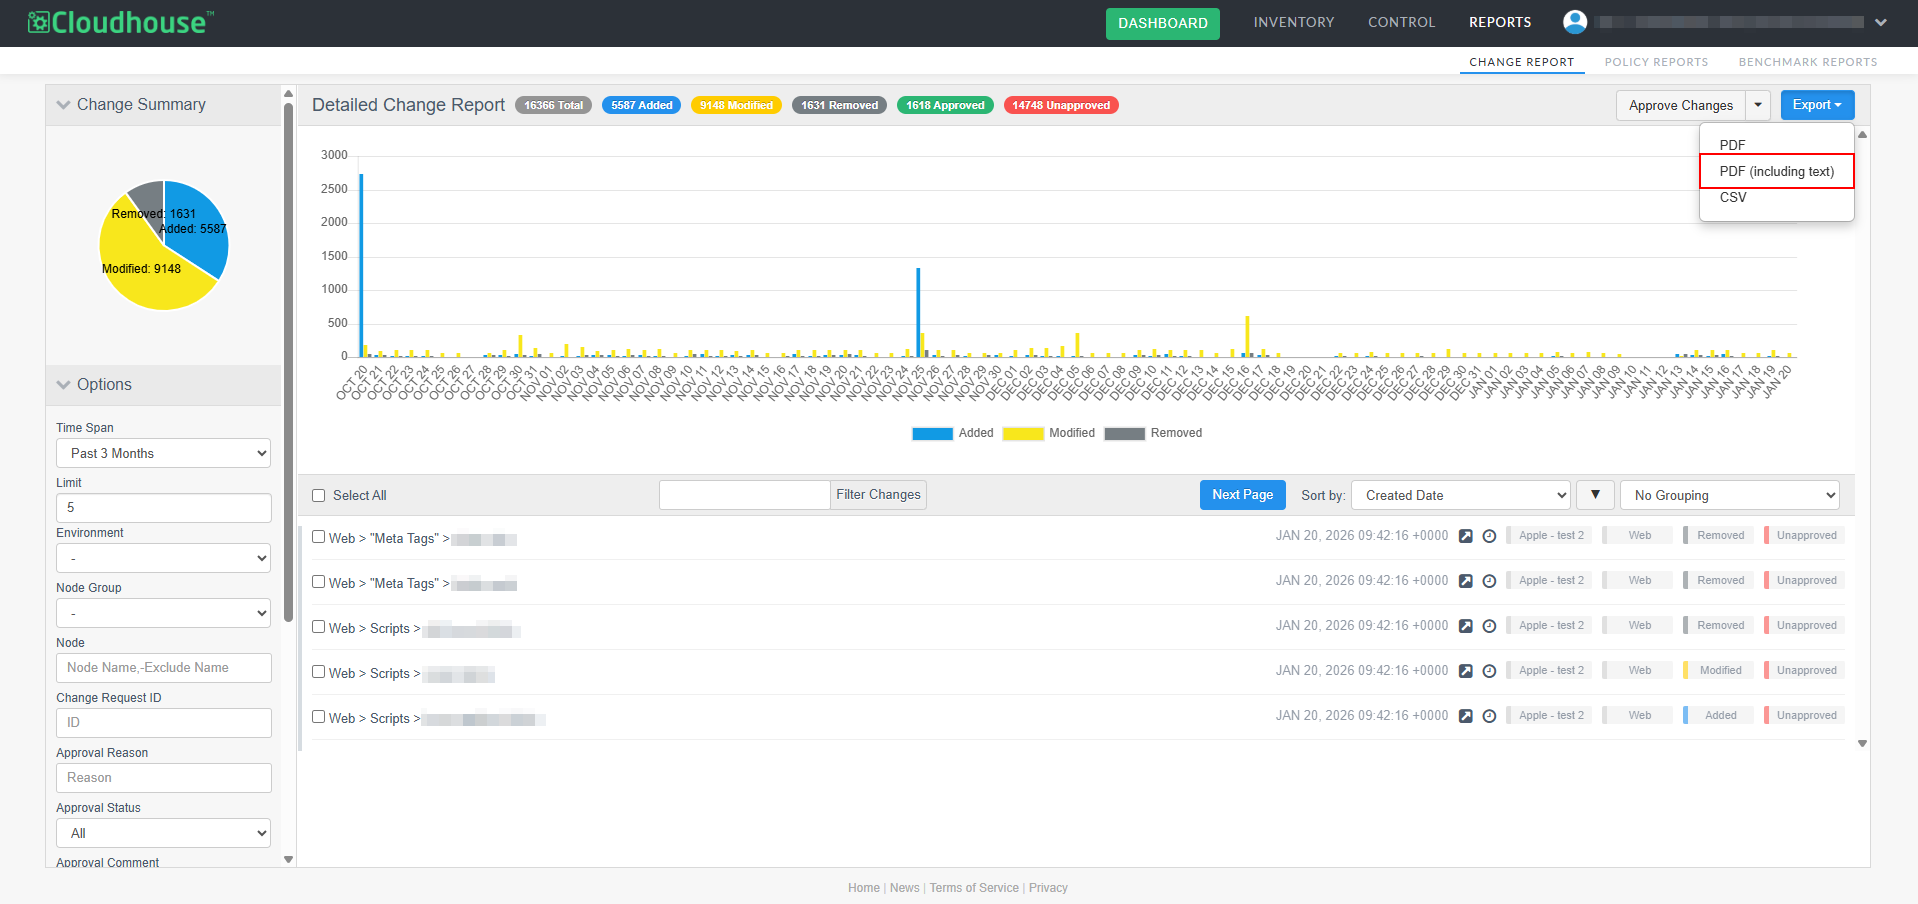
Approval statuses are also displayed when exporting via PDF, PDF (including text) or CSV.
Note: For more information on how to export a report, see Export a Report.
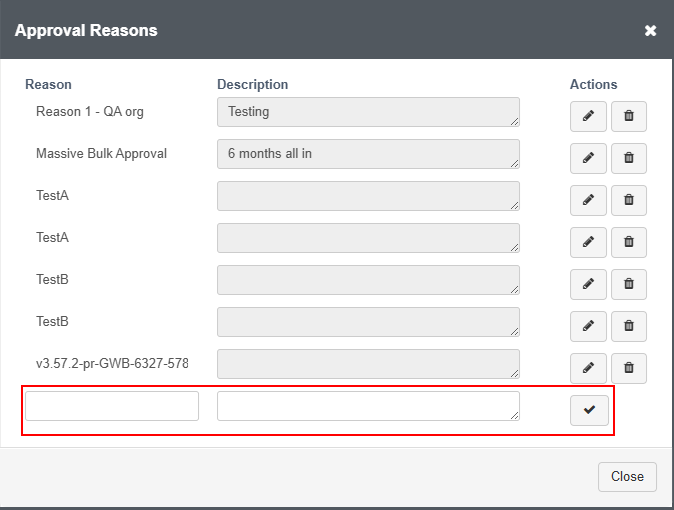
Approval Reasons
An approval reason allows you to identify why a change was approved, and can be used as an alternative to using a change reference ID, if one isn't available. You can apply an approval reason both during and after change approval.
Adding Approval Reasons
The primary method for adding an approval reason is via the Approval Reasons dialog box. This method is most efficient for adding multiple approval reasons at once, before assigning them to changes.
To add an approval reason, complete the following steps:
-
Click the Approve Changes drop-down list, and select Reasons. The Approval Reasons dialog box is displayed.
Tip: Any approval reasons you have previously created will be displayed here.
-
Complete the following options:
-
Reason field – The reason for the change to be approved.
Note: This is what will appear in the Approval Reason drop-down list when manually approving a change.
-
Description field – The description of the approval reason.
-
-
Click the Select (
 ) button to save your changes.
The approval reason is then stored and available to use when manually approving changes. For more information, see Approve Change.
Modifying Approval Reasons
If you have created an approval reason that no longer applies, or needs to be adjusted, you can modify it.
Tip: When an approval reason is modified, all changes that have been approved via the old version are automatically updated to reflect the new approval reason.
To modify an approval reason, complete the following steps:
-
Click the Approve Changes drop-down, and select Reasons. The Approval Reasons dialog box is displayed.
-
Click on the Edit (
 ) button to modify your reason.
 -
Complete the following options:
-
Reason field – Change the approval reason. This is what will appear in the Approval Reason drop-down list when manually approving a change.
-
Description field – Change the description for the approval reason.
-
-
Click the Select(
 ) button to save your changes.
Once complete, the approval reason is modified.
Unapprove Change
Likewise, you can manually remove any changes that were initially approved. There may be cases where an approval will need to be reversed, for example:
-
If a change was approved in error or prematurely.
-
The approval is no longer necessary or relevant.
This gives you more granular control over the approval process.
To remove an approved change, complete the following steps:
-
In the Options drop-down menu, click the Approval Status drop-down list, and select Approved. The change report will refresh to only include approved changes.
-
Select the change(s) that you want to remove approval for by clicking on the relevant checkbox(es).
-
Click the Approve Changes drop-down and select Unapprove Changes.
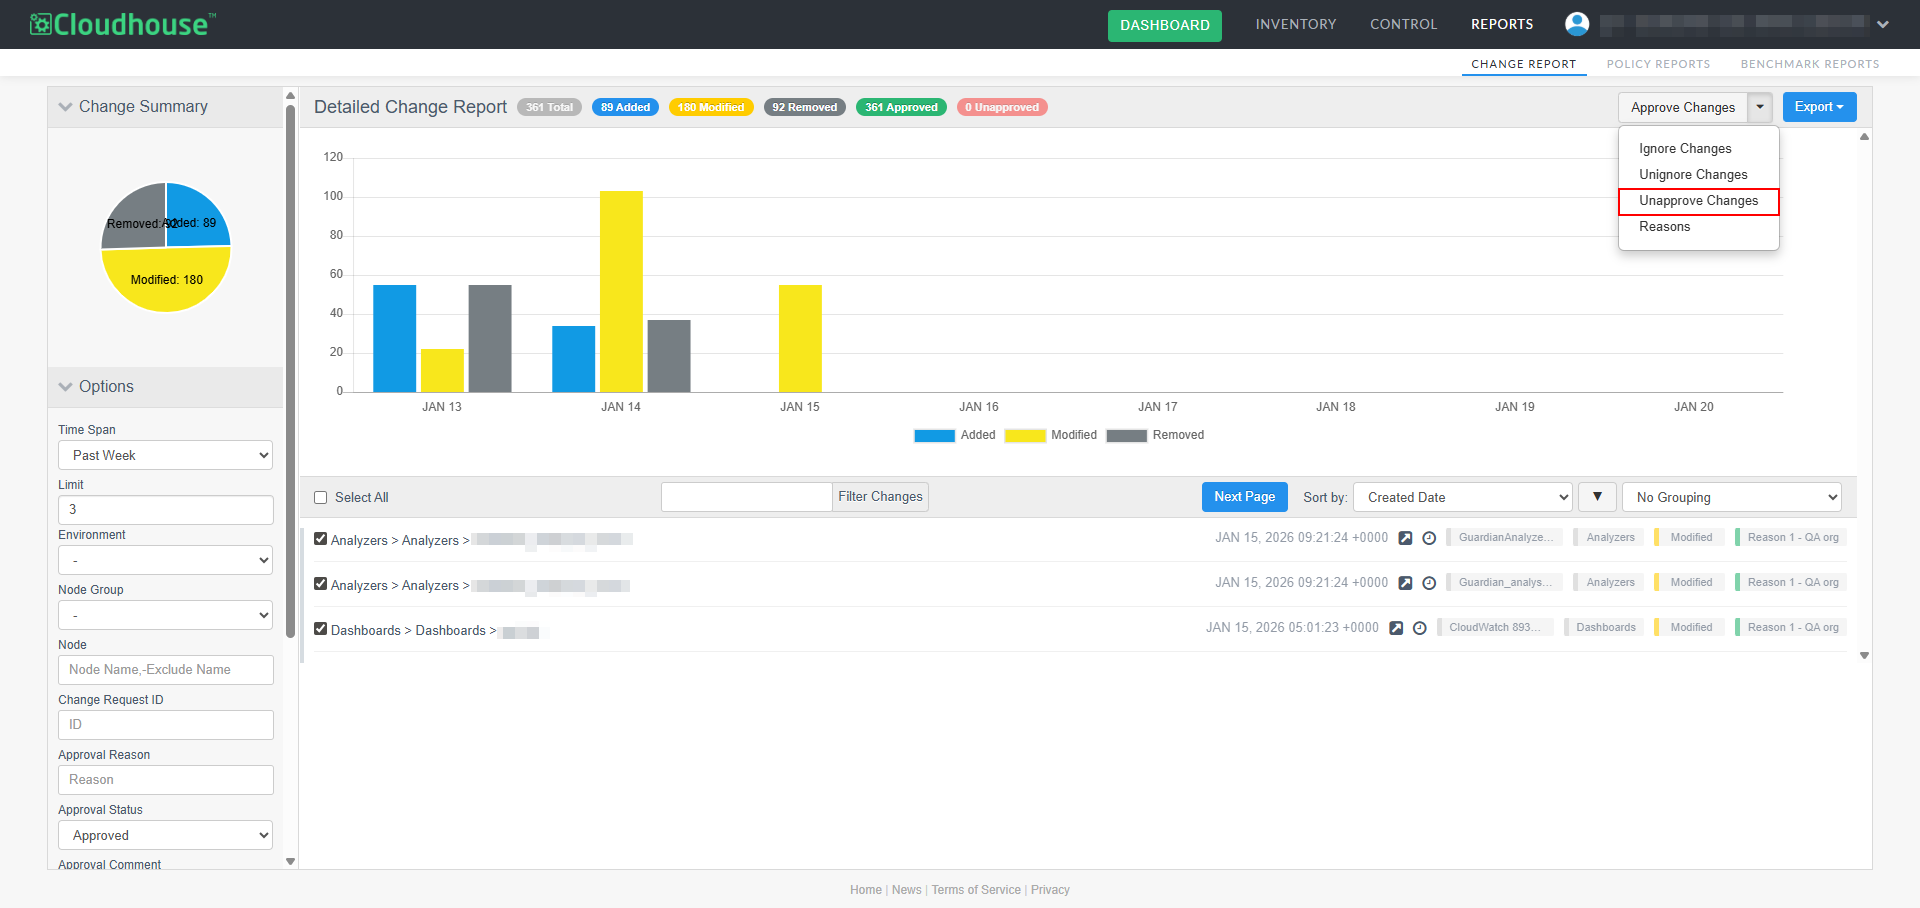
The changes will be reflected with the Unapproved tag in the change report, as seen in the screenshot below.

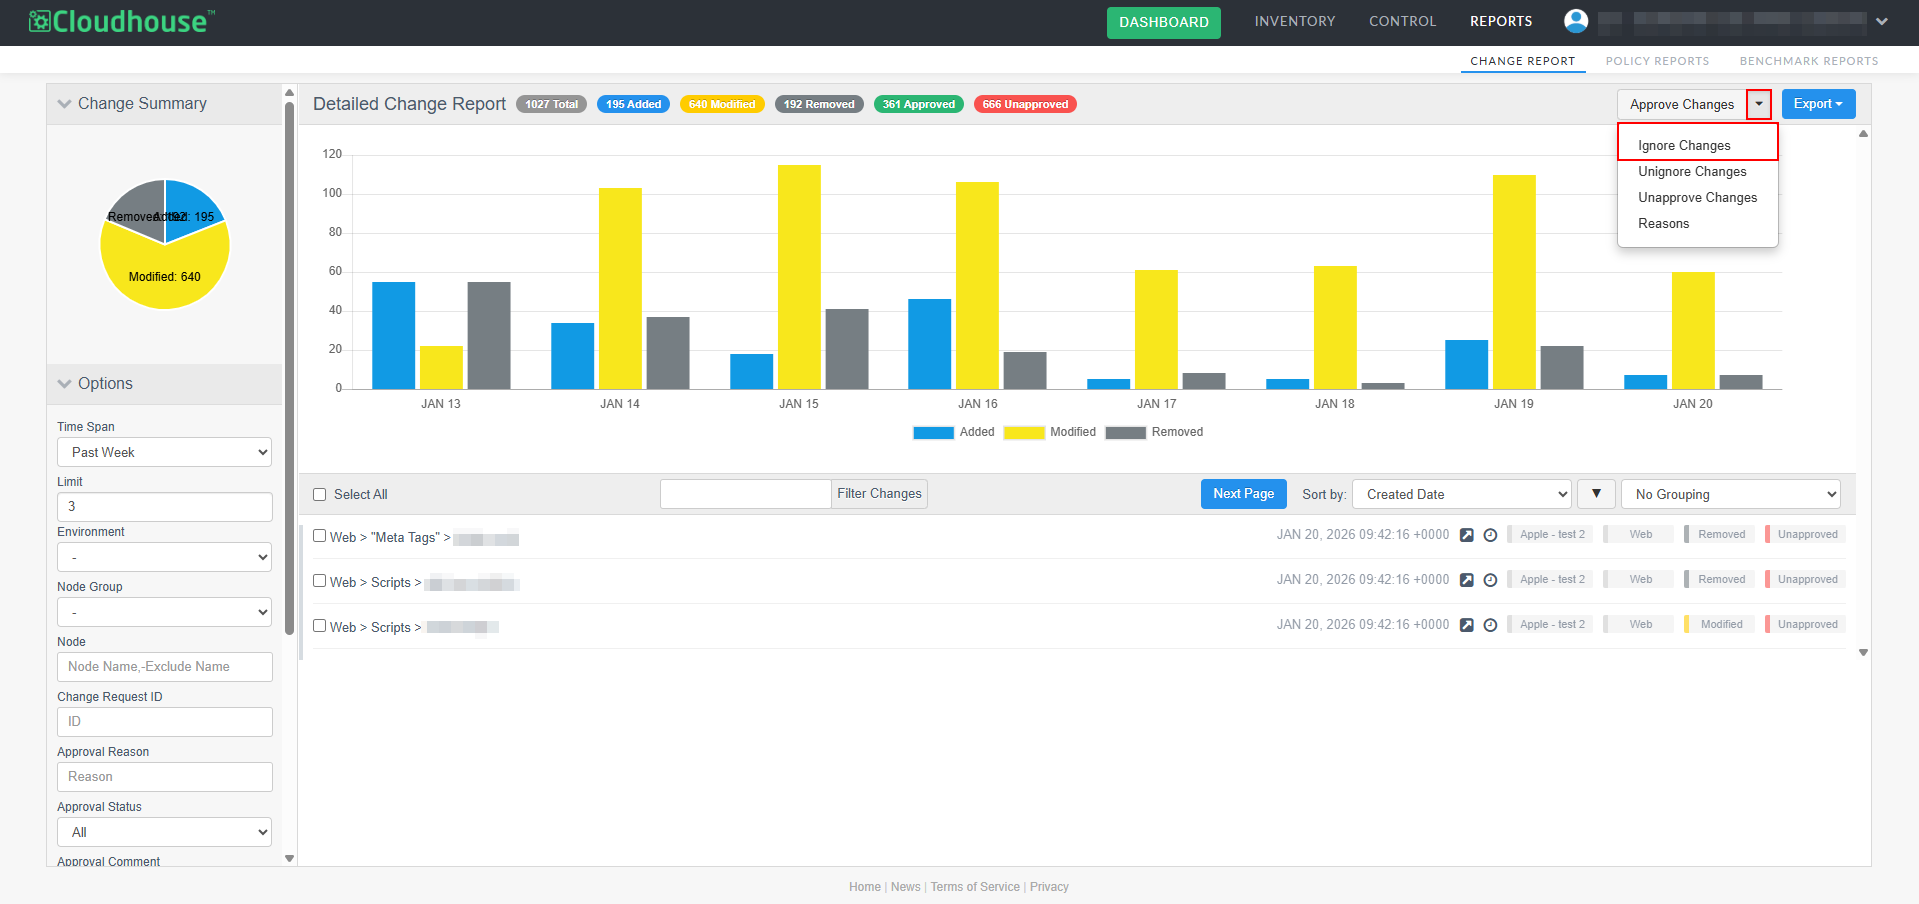
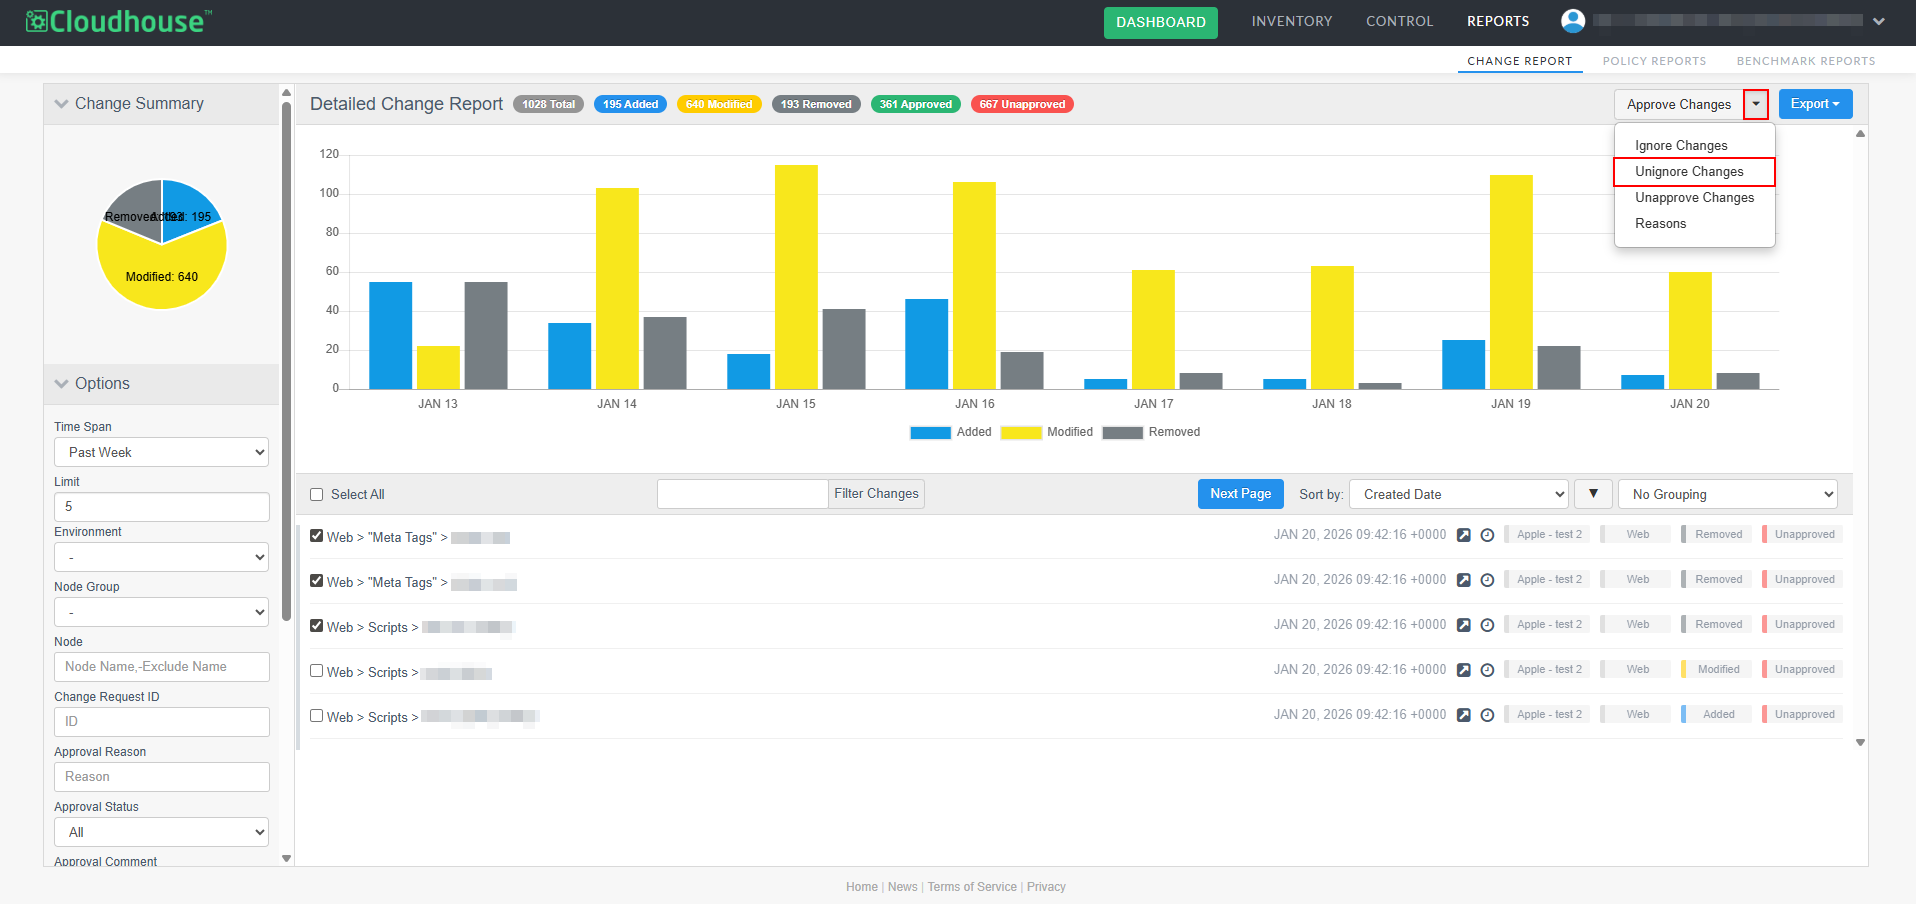
Ignore Change
If you don't want to approve or unapprove a change, but would simply prefer to have it removed from the change report and node scan results page, you can choose to ignore it and have it added to the ignore list for each of the node groups the change belongs to.
Note: This feature was introduced in V3.60.0 of the Guardian web application. Upgrade to this version to access this feature, or see October 2025 Quarterly Release for more information.
To ignore a change, complete the following steps:
-
Select the check box(es) of the change(s) you want to be ignored.
-
Click the Approve Changes drop-down and select Ignore Changes. The Add to Ignore List for Node Group dialog is displayed.
-
Click the Ignore button to add the change(s) to the ignore list for the selected node group(s).
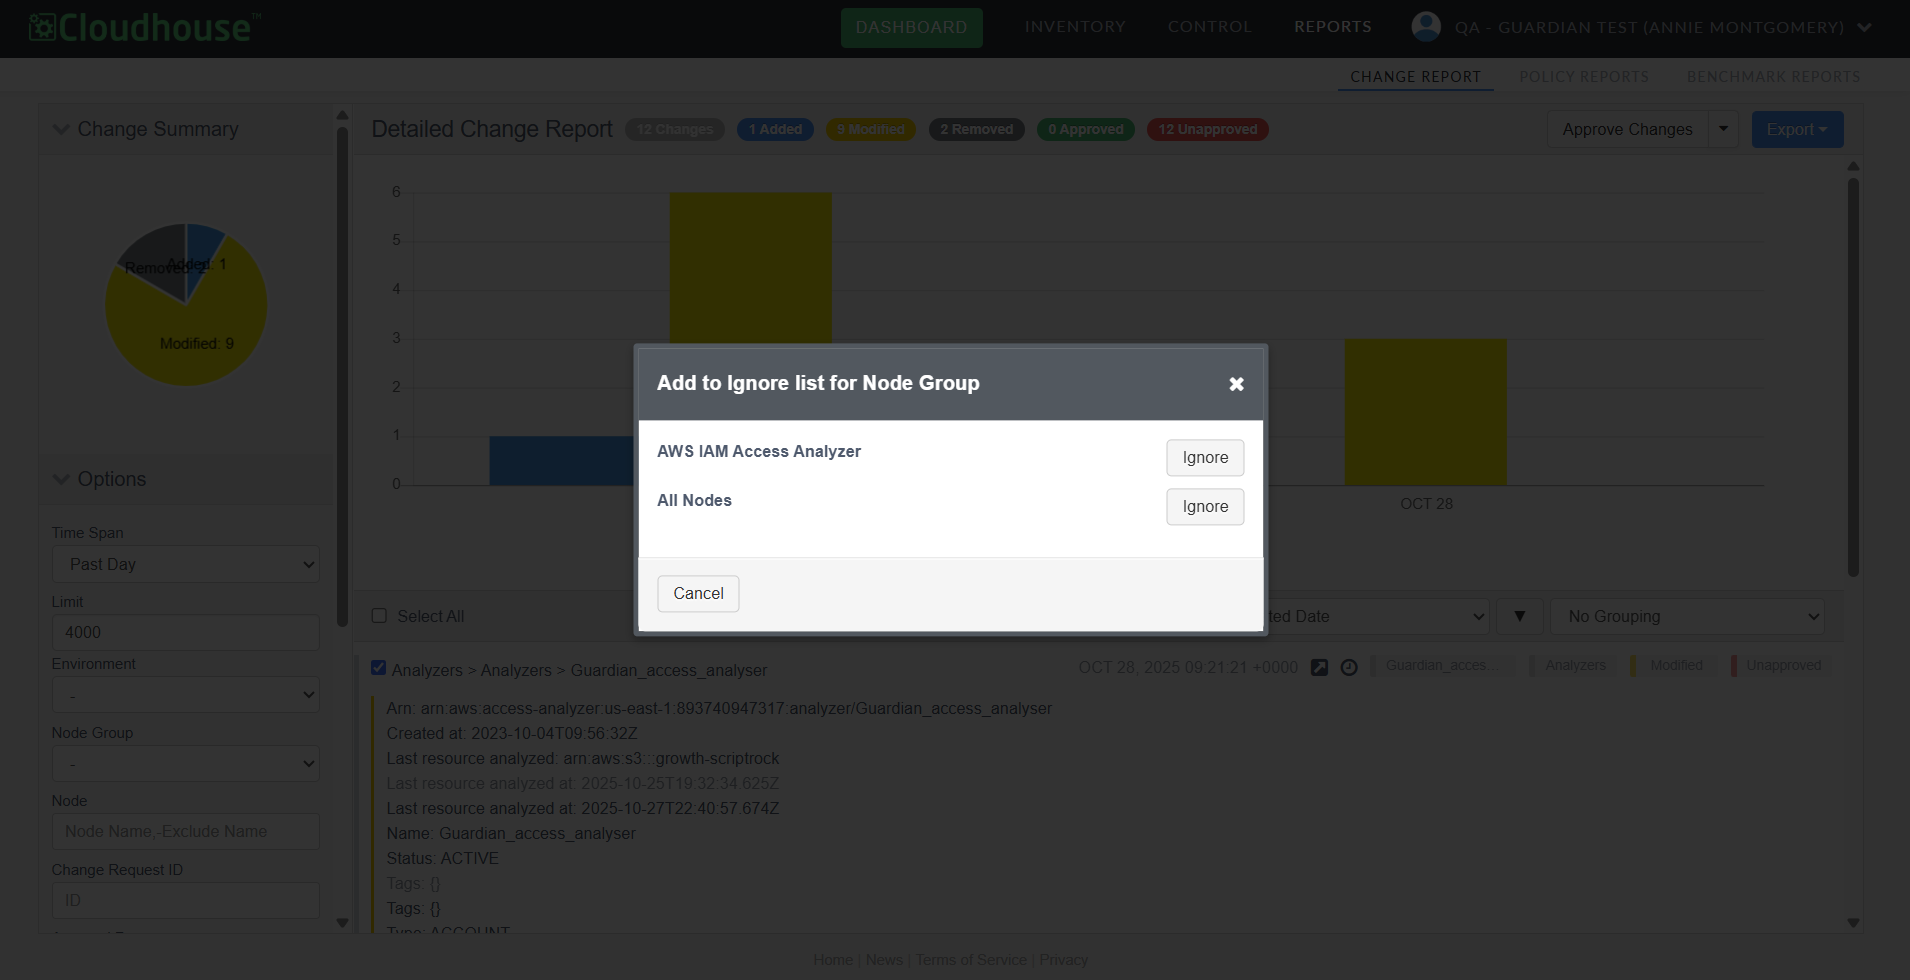
Once complete, the change is removed from the change report and added to the ignore list for the stipulated node groups, meaning it will not be displayed within the node scan results page for that group.
Unignore Change
Additionally, you can select multiple ignored items and restore them in a single action, eliminating repetitive steps and reducing page reloads.
Note: This feature was introduced in V3.61.0 of the Guardian web application. For more information, see December 2025 Monthly Release.
To unignore multiple changes within the Change Report tab, complete the following steps:
-
In the Display drop-down menu, click the Include Ignored Items option. A list of the ignored changes within the report are displayed.
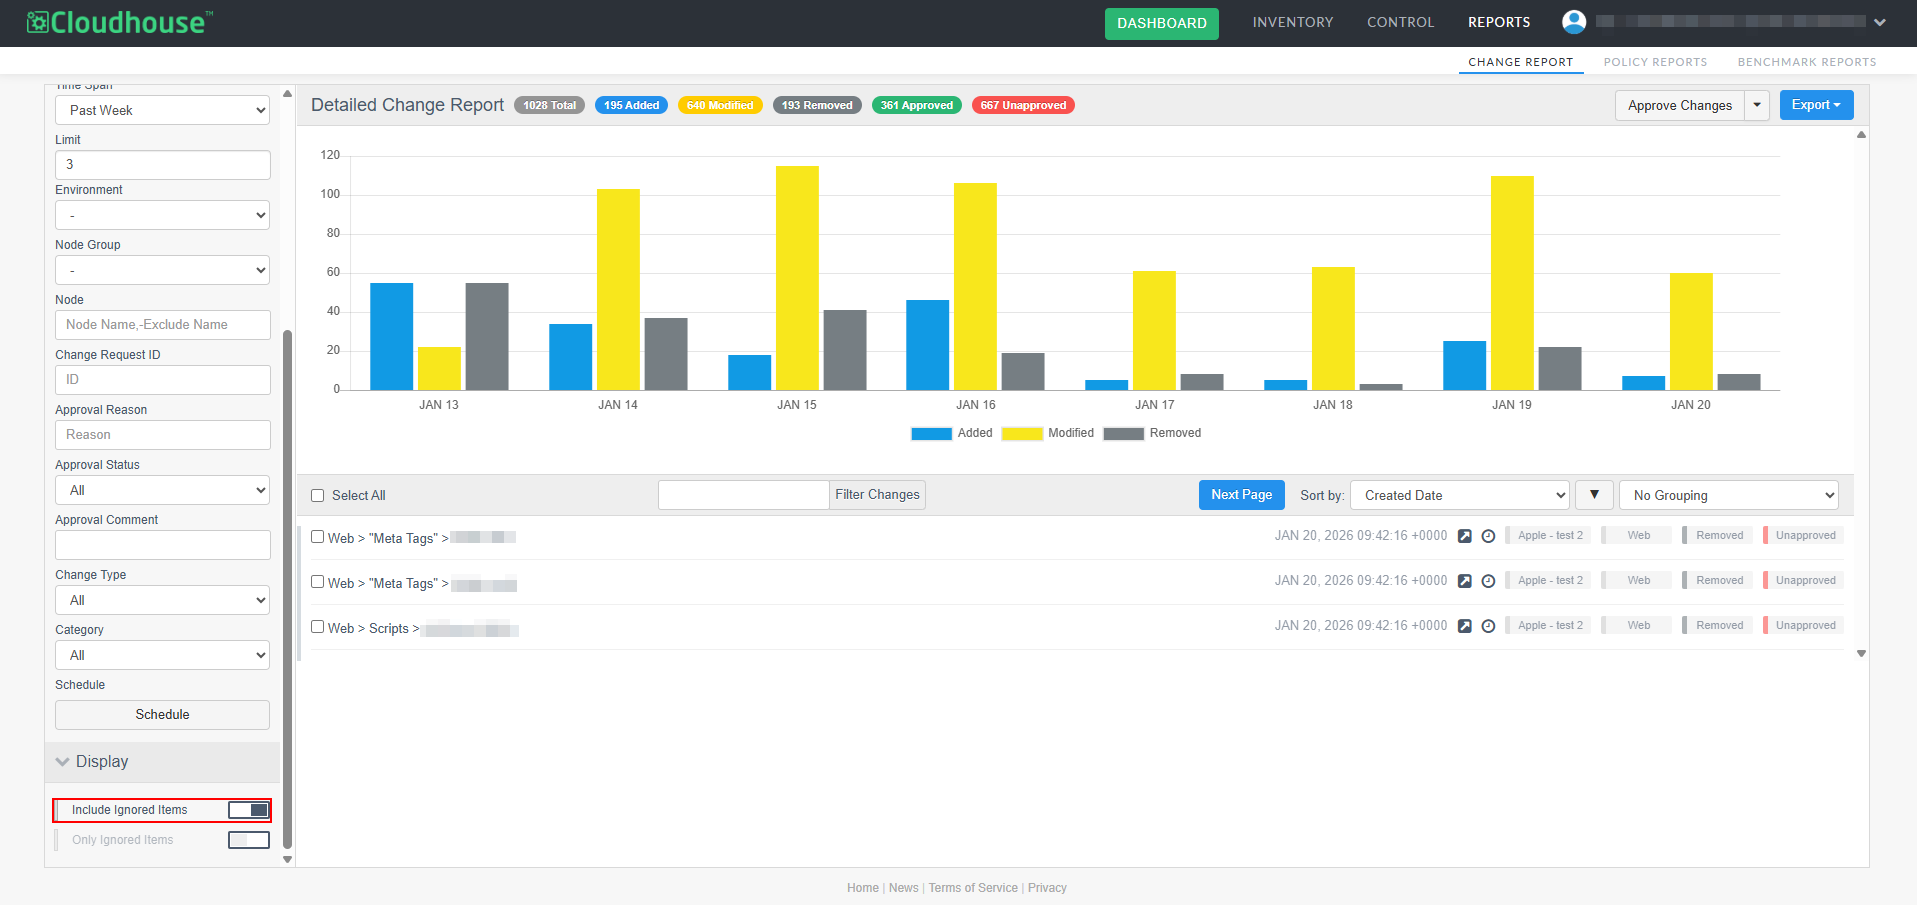
-
Select the checkbox for each change you want to unignore.

-
Then, click the Approve Changes drop-down and select 'Unignore Changes' from the list of options.
Once complete, the list of ignored items is updated and the options you selected to unignore are added back into the change report's data set.
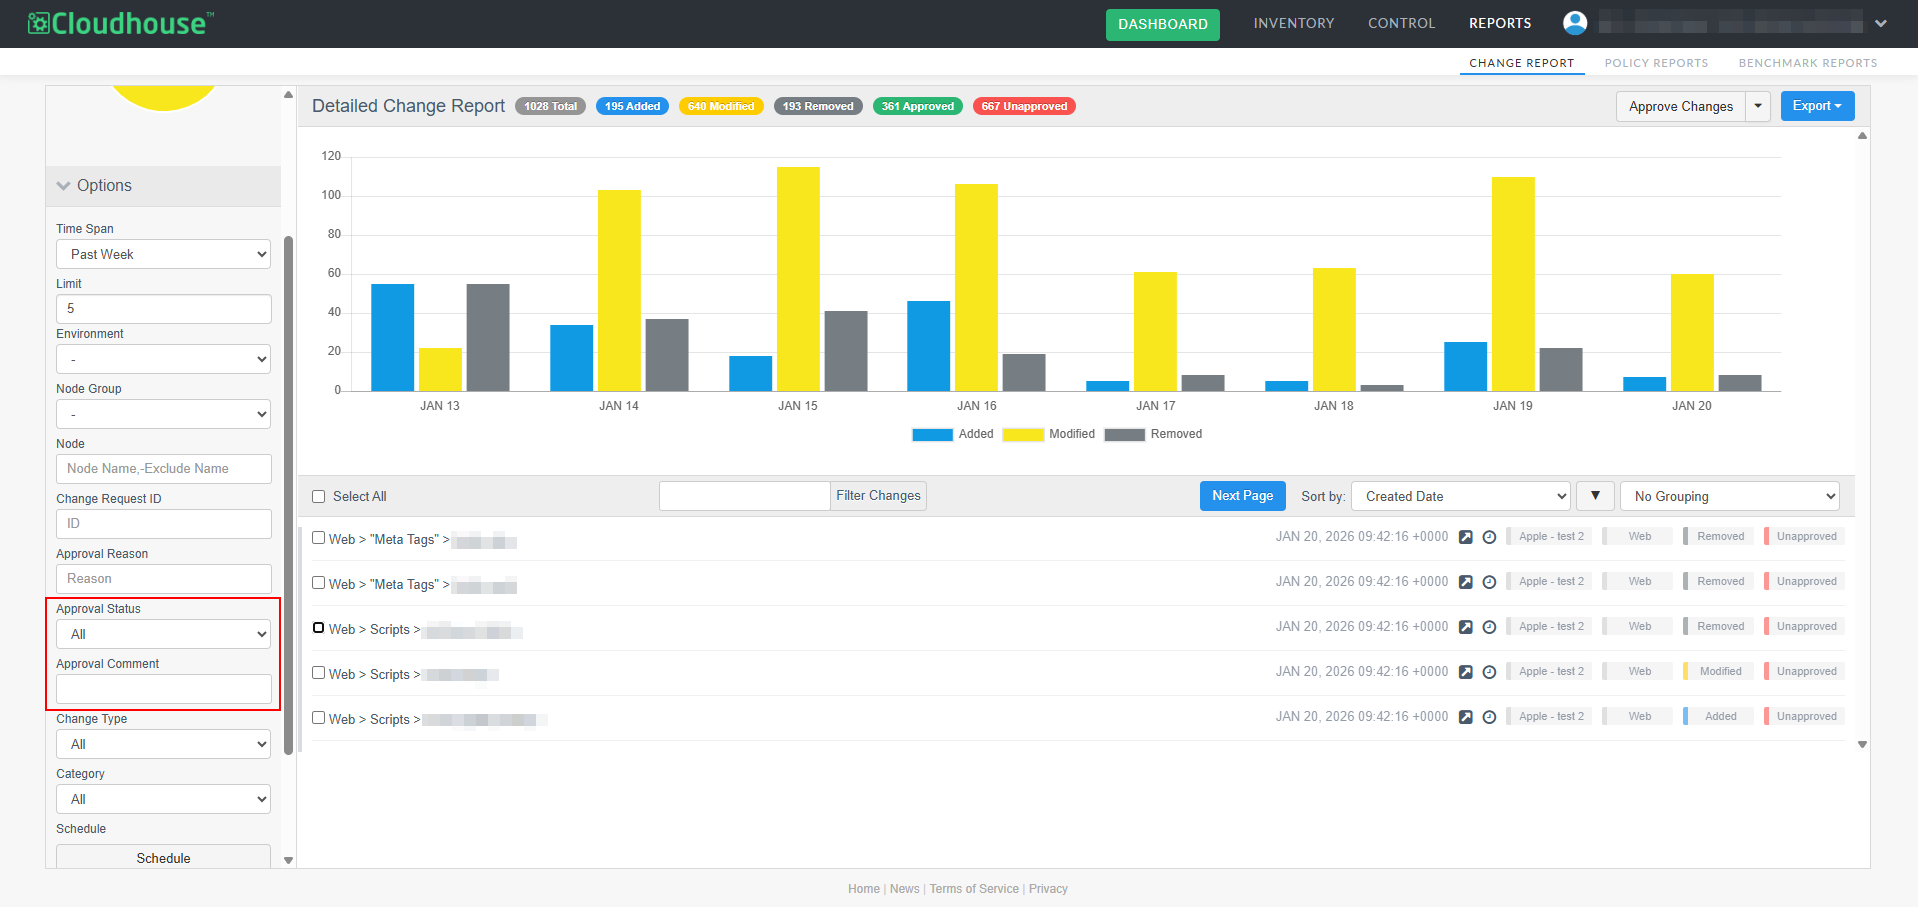
Additional Filter Options
Within the Options drop-down menu, you can now filter changes by change request ID or approval reason, which are created when approving changes. For more information on the full list of options available in this menu, see Report Options.
View Differences in Text Files
The Change Report tab displays changes made within text files, which is useful for identifying configuration changes that occur within one iteration of the same file and the next, or two completely different files. By comparing text files, files, you can quickly pinpoint what has changed and why it matters in your Guardian instance.
To view these changes, complete the following steps:
-
Find the text file you wish to view. You can do this by entering .txt into the Filter Changes text box. The change report refreshes to only include .txt files.
-
Click on the relevant change.
-
Select Show.
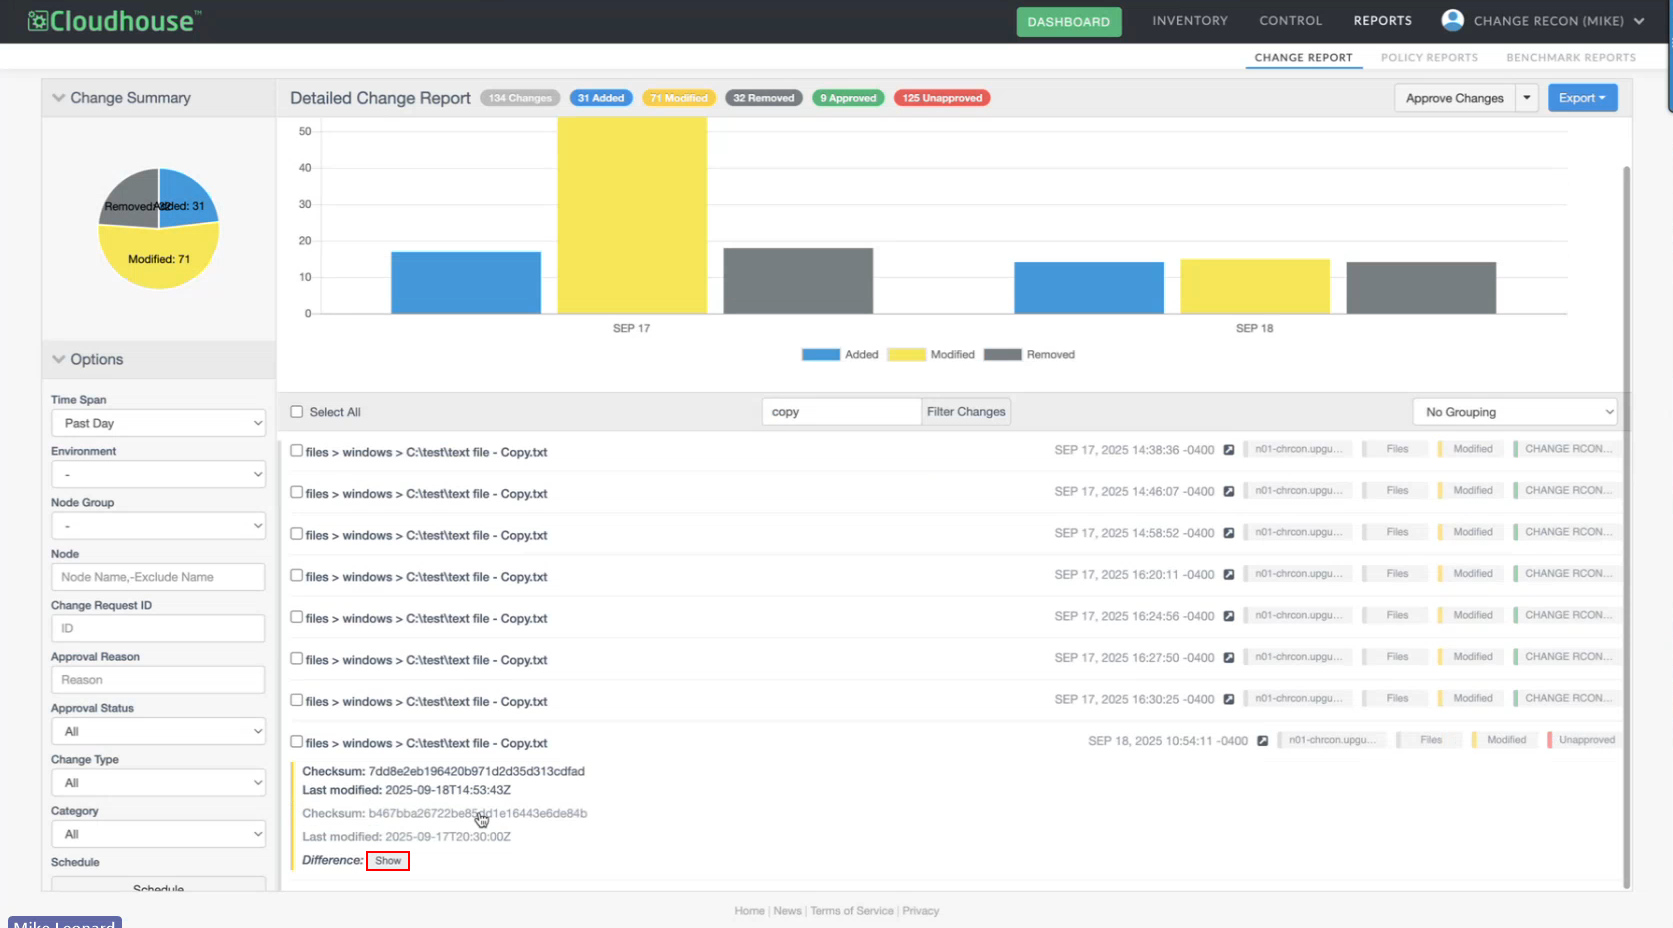
-
A side by side comparison between the previous file and the new file is displayed.

These changes can also be viewed within an exported PDF.
To view these changes within a PDF, complete the following steps:
-
Find the relevant text file you wish to view. You can narrow these results by entering .txt into the Filter Changes text box.
-
Click on Export and select PDF (including text).
-
Open the PDF and find the relevant text file.
-
The difference in the text file is then displayed.
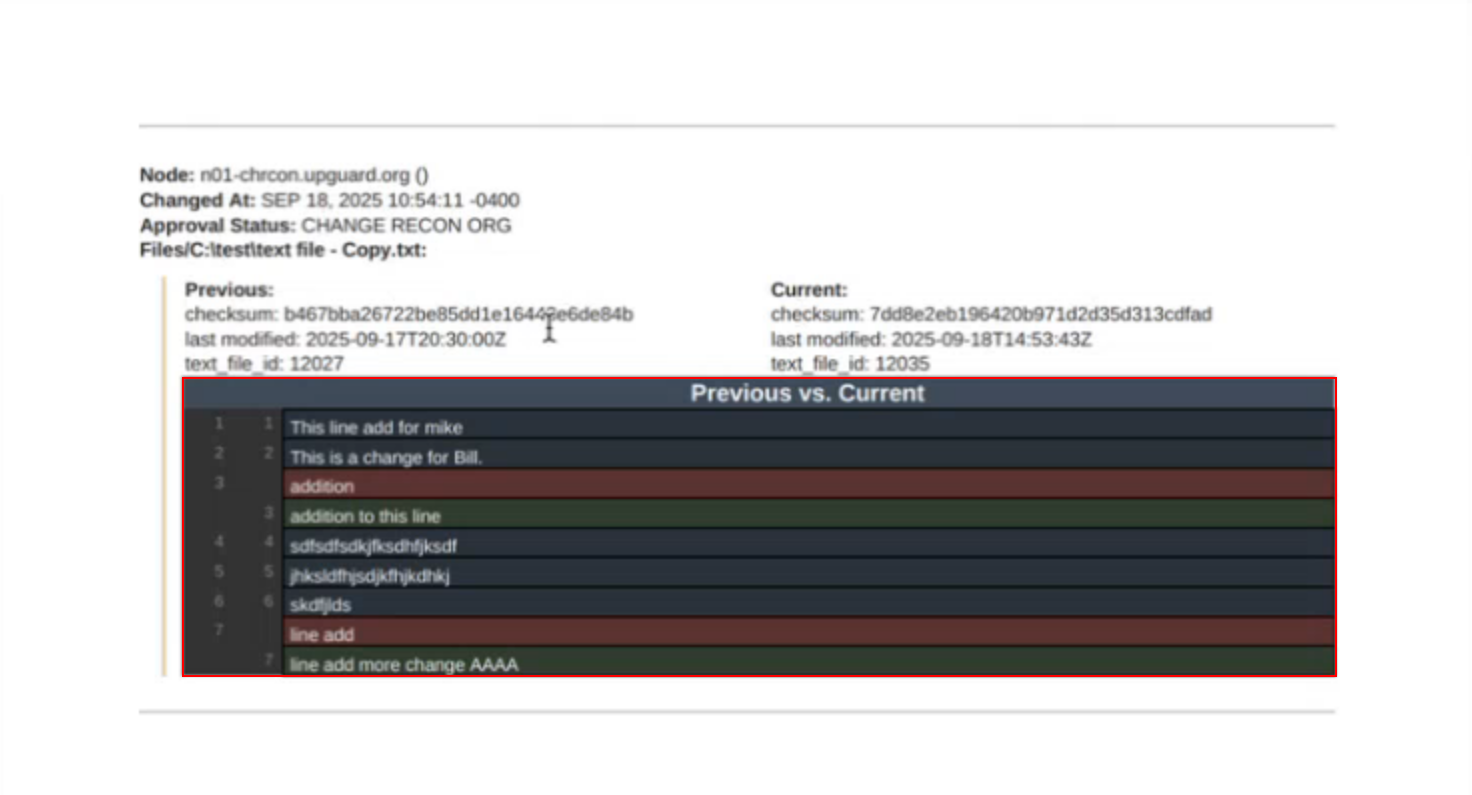
Each color in the report represents the following:
-
Red – Previous entry
-
Green – Current entry.
-
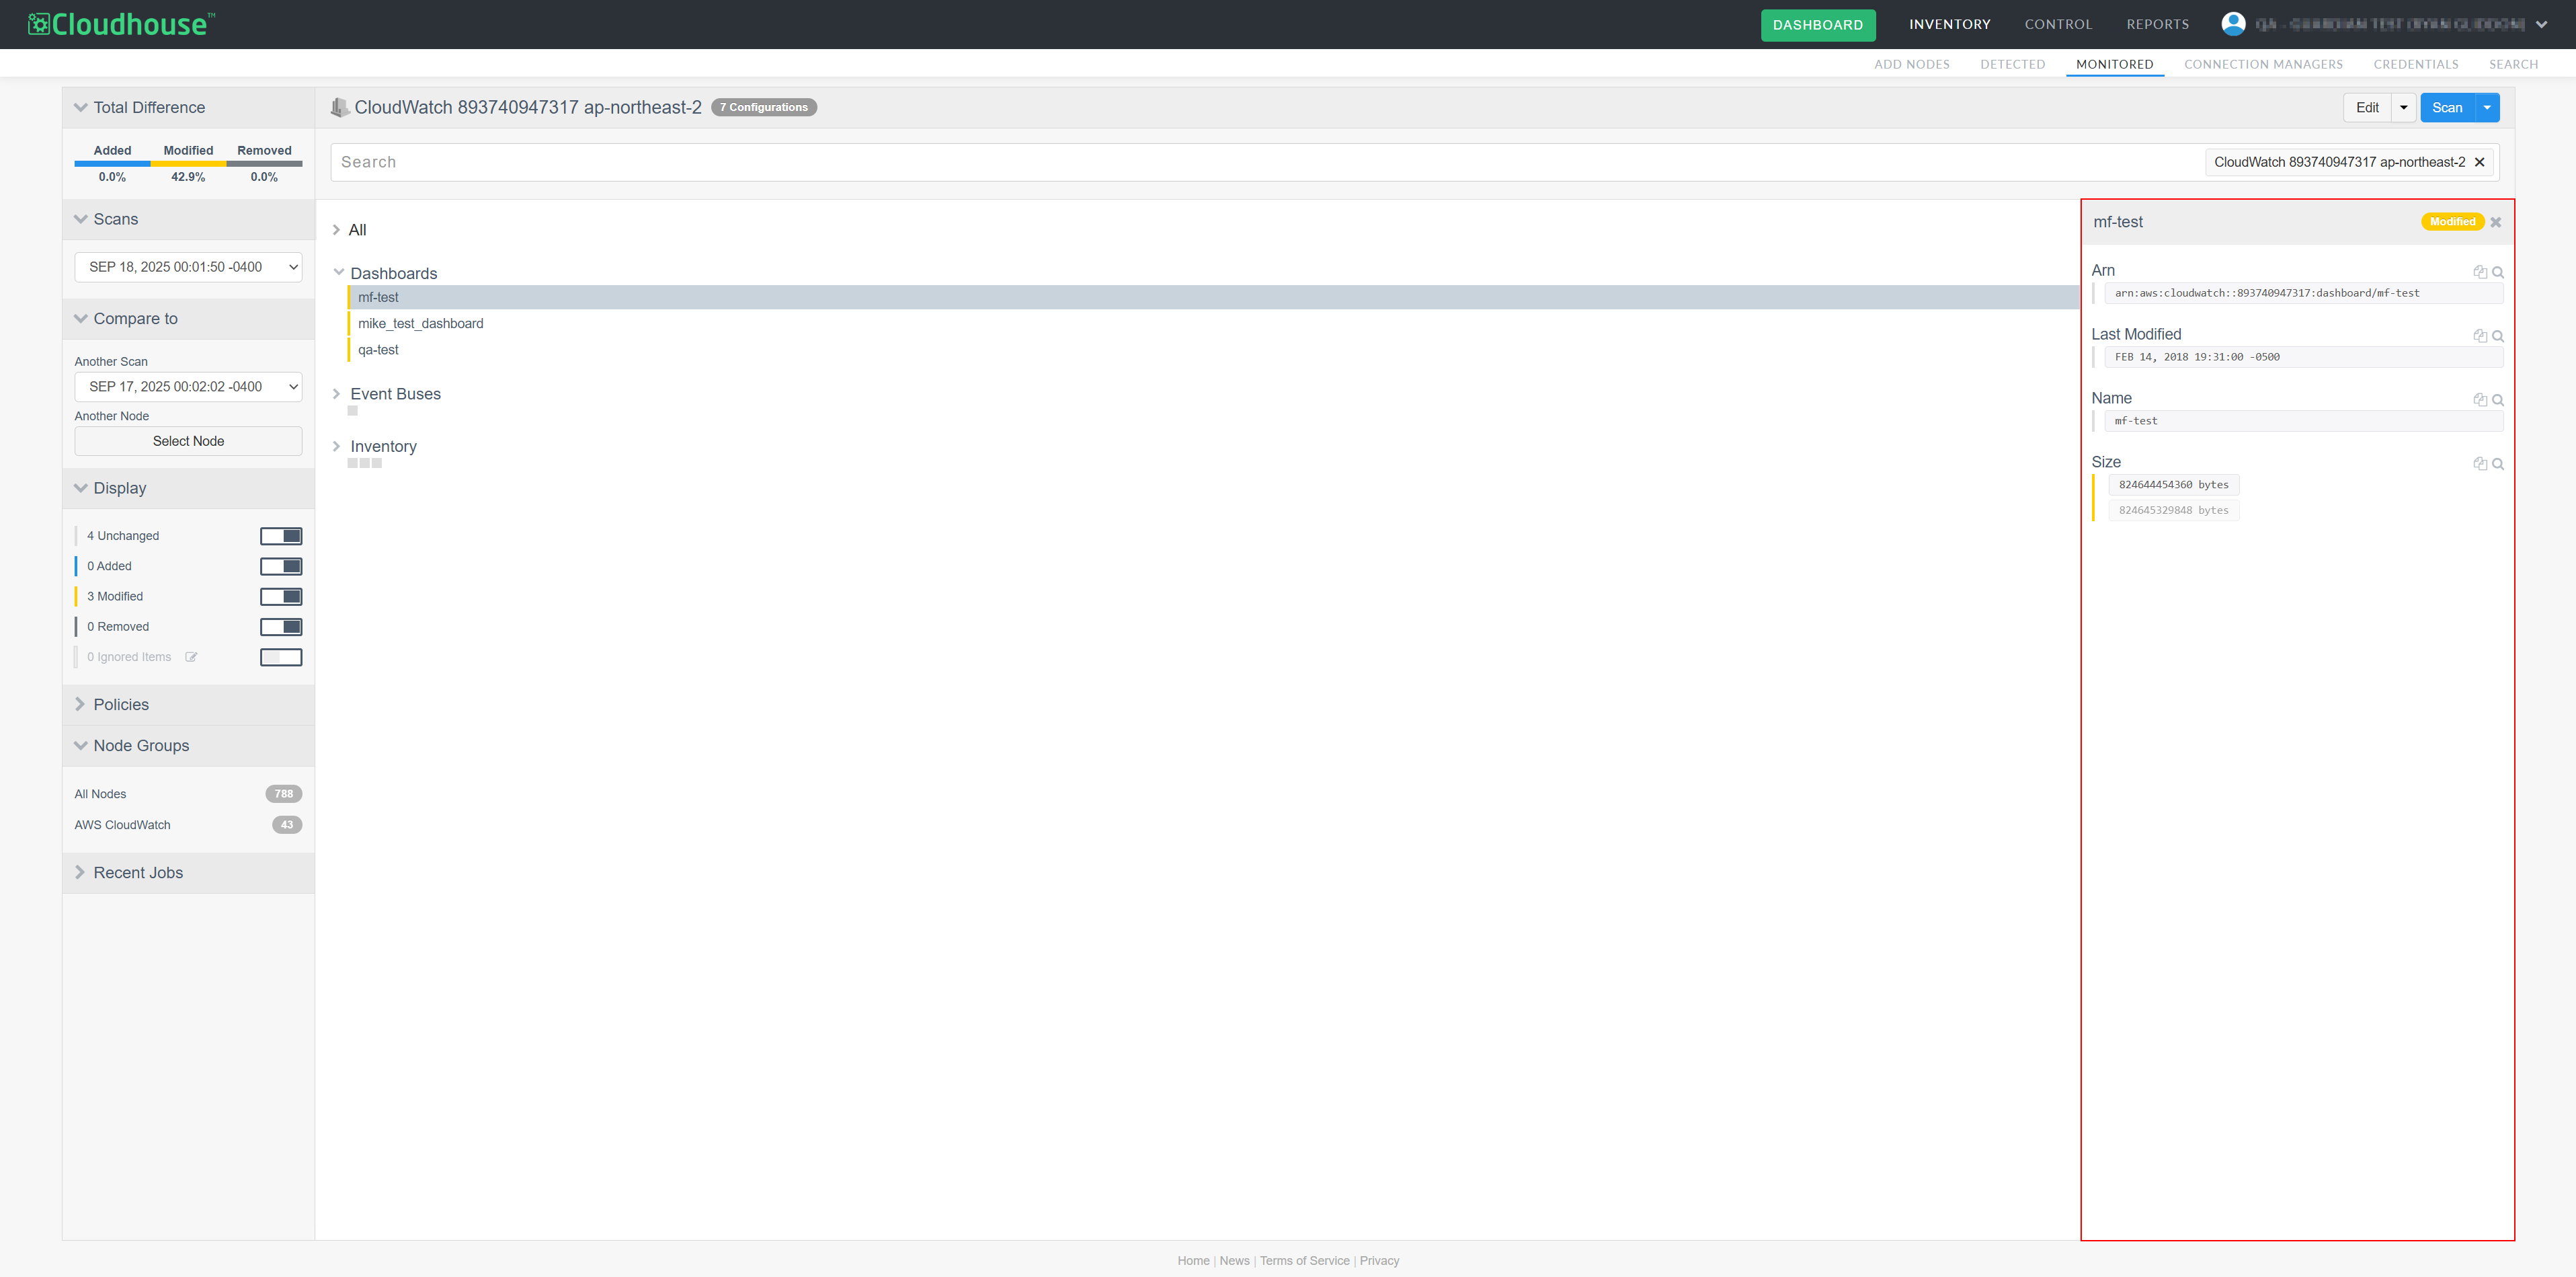
View Differences on Node
You can now view any differences that have occurred on a node through the Change Reports tab. To do this, click the View Diff on Node button (↗) next to the name of the node on the relevant change.

This will take you to the corresponding node in the Monitored tab (Inventory > Monitored). Here, you can view all changes that are associated with this node, including details for these changes, as shown in the screenshot below. For more information on the Monitored tab, see Monitored.
Note: The View Diff on Node button can only be viewed when filtering by No Grouping.
| Included in Version | Release Date |
|---|---|
| V3.60.0 |
The following changes were made for the Manual Change Reconciliation feature in the October 2025 release of Guardian.
Sort Change Report by Key Fields
Sort the change report by key fields in either ascending or descending order. This makes it easier to classify, review, and prioritize changes, improving both usability and efficiency across more complex configurations.
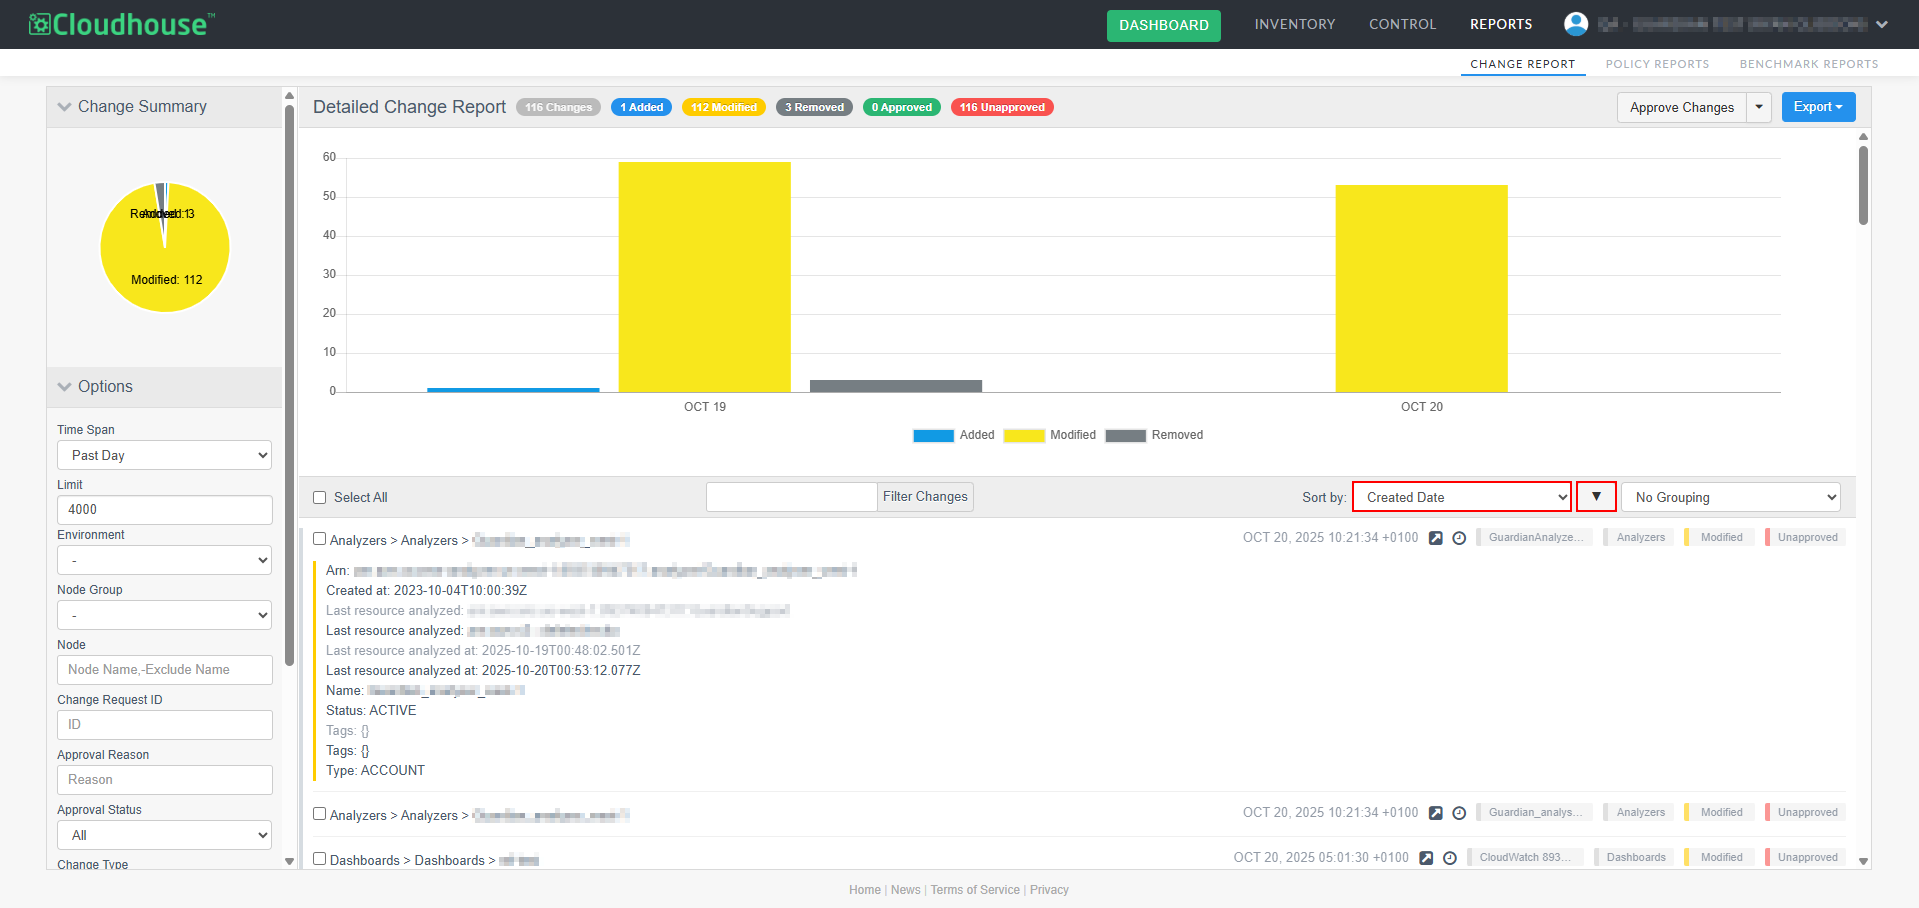
Sort the change report using the following fields:
-
Path – The full path for the configuration item (CI), such as a file or folder.
-
Created Date – The time and date the change was made. The report is sorted by this field in descending order by default.
-
Node Name – Name of the node.
-
Type – The section of the scan the node appears in (Analyzers, Dashboards, Log Groups, Web).
-
Status – The status of the change (Added, Modified, Removed).
This sorting functionality works seamlessly with paging and export features, ensuring consistency across the interface and exported reports.
View All Related Elements for Modified Nodes
The Change Report tab now provides a more complete view of configuration changes. Previously, when a node was modified, only the elements that had changed were shown. With this enhancement, you can now view all elements related to a changed node, including those that remained unchanged.
This enhancement gives you full visibility into the state of a node at the time of change, which is especially helpful when reviewing complex configurations. It allows for more informed analysis by showing both the changes and the surrounding context.
View Entire Change History
You can now view the full history of a specific change directly from the change report without needing to manually adjust filters or timelines.
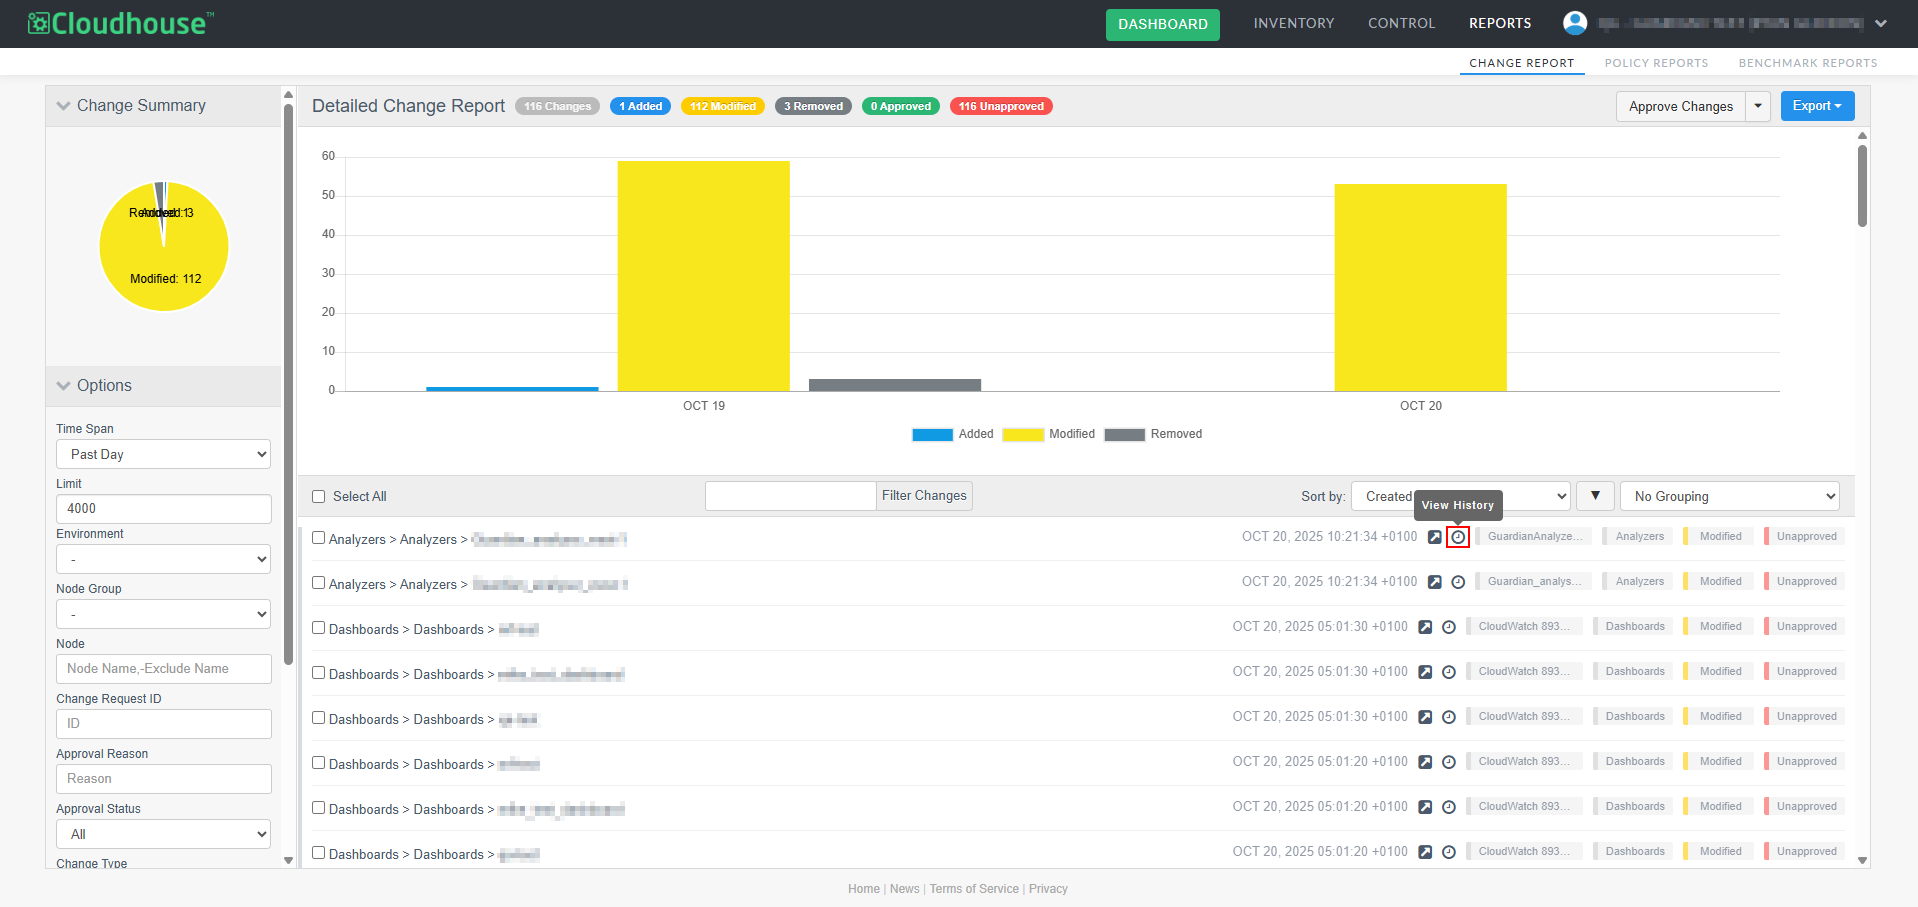
To view the change history, complete the following steps:
-
Locate the change you want to investigate.
-
Click the View History (
 ) button. A full list of modifications related to that change appears.
This button automatically displays all modifications related to the selected change, allowing you to review its complete history without losing your place in the report. This feature streamlines investigations and improves overall usability.